Best Practices for Amazon Product Photography [2022]

People don’t read when shopping online – they scan. According to Crowdriff, 53 percent of consumers found that images are more important than reviews. And 67 percent say that images are very important in making a purchasing decision.
In a world of scanners, product photography is arguably the most important conversion factor. Yet so few people get ecommerce product photography right.
In this article, I’ll discuss what kinds of photos you need to include in your listing and how to do them right. You can apply these tips to your images on other platforms such as eBay and Shopify, but we’re focusing on Amazon here and the company’s specific requirements for listing images.
We’ve implemented these best practices in our own brands, and they have boosted our conversion rates almost immediately.
Related Reading: Who Has the Best Graphic Designs for Amazon Sellers?
Contents
- What Are Amazon’s Image Requirements?
- What’s the Recommended Image Dimensions?
- Can I DIY My Amazon Product Photos?
- What Kinds of Images Do You Need to Include in Your Amazon Listing?
- The Main Listing Image
- Infographic
- Product Specification Image
- Lifestyle Photo
- Lifestyle Image Hack
- Product with the Packaging
- Before and After Photos
- Split Testing Your Product Images
- Conclusion
What Are Amazon’s Image Requirements?
Before you even begin to think about where to get models or how to find the best lighting, you should make sure that you know Amazon’s image requirements.
Here’s a summary of the most important ones:
| Format | JPEG (preferred), TIFF, PNG, and GIF (not animated) |
| Dimensions | At least 1000px to enable zoom, but for optimal zoom experience, use 1600px |
| Inclusions for Main Image | Product only, on white background |
If you visit Amazon, there are still many listings that violate the product image requirements. One of the most common violations is adding objects aside from the product in the main image.
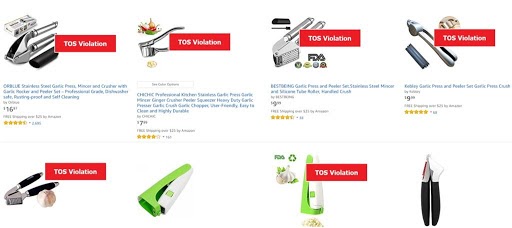
You will notice that six of the top eight listings have a main gallery image that is in violation of Amazon’s Terms of Service (TOS). The unofficial word from Amazon is that it generally lets images in violation of their guidelines slide if they are helpful to the consumer. Take this as you may.
I think most would agree that the picture of a garlic in the bottom left helps make that image pop more than the other images and it is somewhat useful to the consumer. Including an image aid like this may help increase your conversions and have a relatively minor risk with Amazon.
Nevertheless, still check the image requirements. And in case you’ll be hiring a professional to handle your product photography, make sure they are aware of what’s allowed and what’s not so you don’t run into any troubles during upload.
What’s the Recommended Image Dimensions?
As mentioned earlier, your images should be at least 1600px to get that optimal experience. As to the aspect ratio, we recommend that you stick to 1:1, which results in a square image.
Having a square image makes sure that you get the most out of the real estate available. Consider the example below:
The seller could have done more with the unused space on the top and bottom. Let's compare this with their second photo, which is a square. Here, all the sides were used, and nothing is wasted.
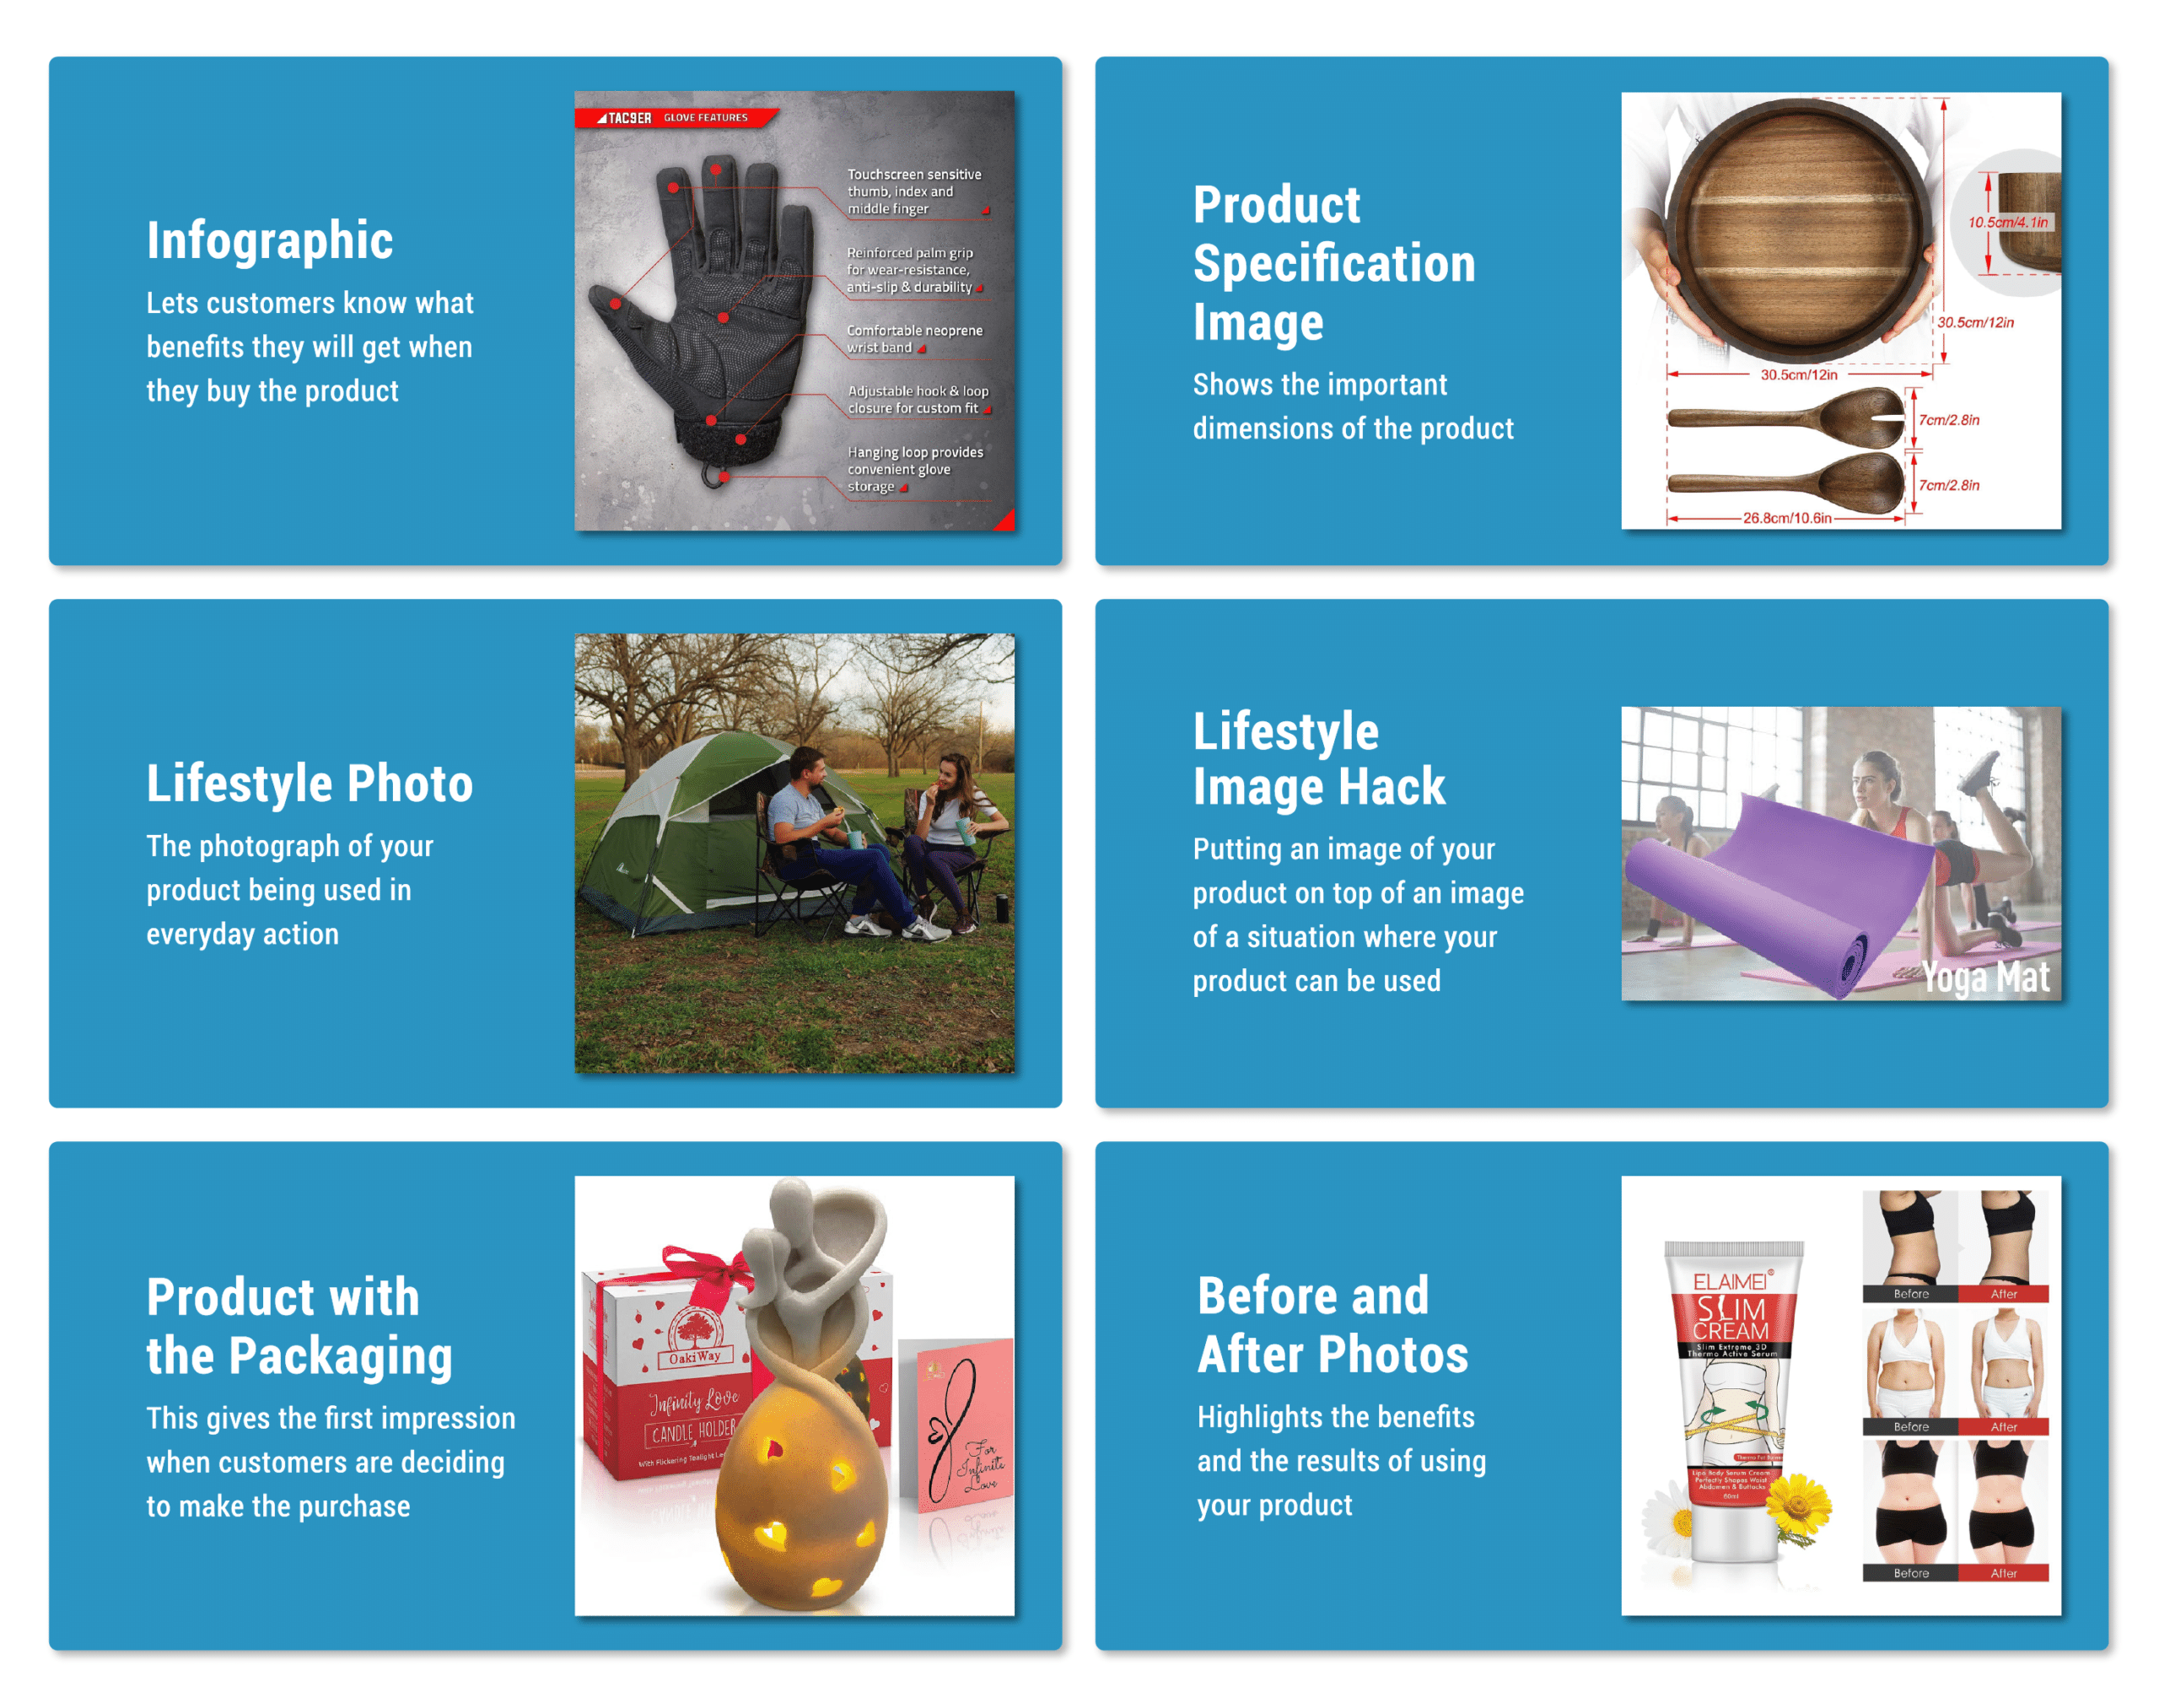
What Kinds of Images Do You Need to Include in Your Amazon Listing?
As much as possible, you should include the following images in your listing:
- Main image (mandatory)
- Infographic
- Product specification image
- Lifestyle photo
- Product with the packaging
- Before and after photos
You can upload at most nine product images in a listing. You should try your best to include all nine. However, there are sellers that upload only seven because those are the only ones customers will see without clicking on the arrow to show more images.
If you’re using less than six, you are really shooting yourself in the foot. There is some suspicion amongst Amazon sellers that quantity of photographs is somewhat of a direct (albeit small) ranking factor for Amazon.
Next, I will discuss what these images are and how you can optimize each for increased conversion.
The Main Listing Image
The main image is the most important among your product photos. It’s the first image that potential buyers see. So put your best foot forward and make your main image the best it can be.
Just remember Amazon’s requirements:
- Don’t include any props in the main image. (So no watermarks or logos too.)
- The background should be white.
As mentioned before, adding small props that can help customers identify your product better will not likely result in any trouble with Amazon. However, the white background is non-negotiable. This is because the main image will appear in the search results, and if your background isn’t white, it will not blend in with the page.
Make sure you show your product’s best angle. For depth, you can also add shadows, just like this:
Also, make sure that you are taking actual photographs of the product. No drawings, no matter how cute and on-brand they are, can substitute for the actual photo when it comes to the main image.
You can get away with this for other types of images, just like this one:
But for the main image, make sure that you’re showing the actual product.
Infographic
Your main image gives customers an overview of your product. This next type of image will let them know what benefits they will get when they buy it: the infographic.
An infographic will contain a picture of your item along with three to six main features of the product. These main features are important selling points that you can also discuss in your bullet points. Don’t be afraid to repeat identical information listed in your bullet points or product description because most people won’t read those.
Keep your features to one or two sentences max. You can use a white background, or just like the image above, use a non-distracting background that reflects your brand. You can have arrows pointing to various parts of the picture to highlight the main features.
You can also include photos that tell customers how they can properly use the product such as this one:
This makes it easy for customers to gauge how much work they need to do once they receive the product.
Product Specification Image
No matter how basic the product, there are always a few critical dimensions to it. People who are browsing online don’t read everything in your product description, so make sure you have an image that shows the important dimensions.
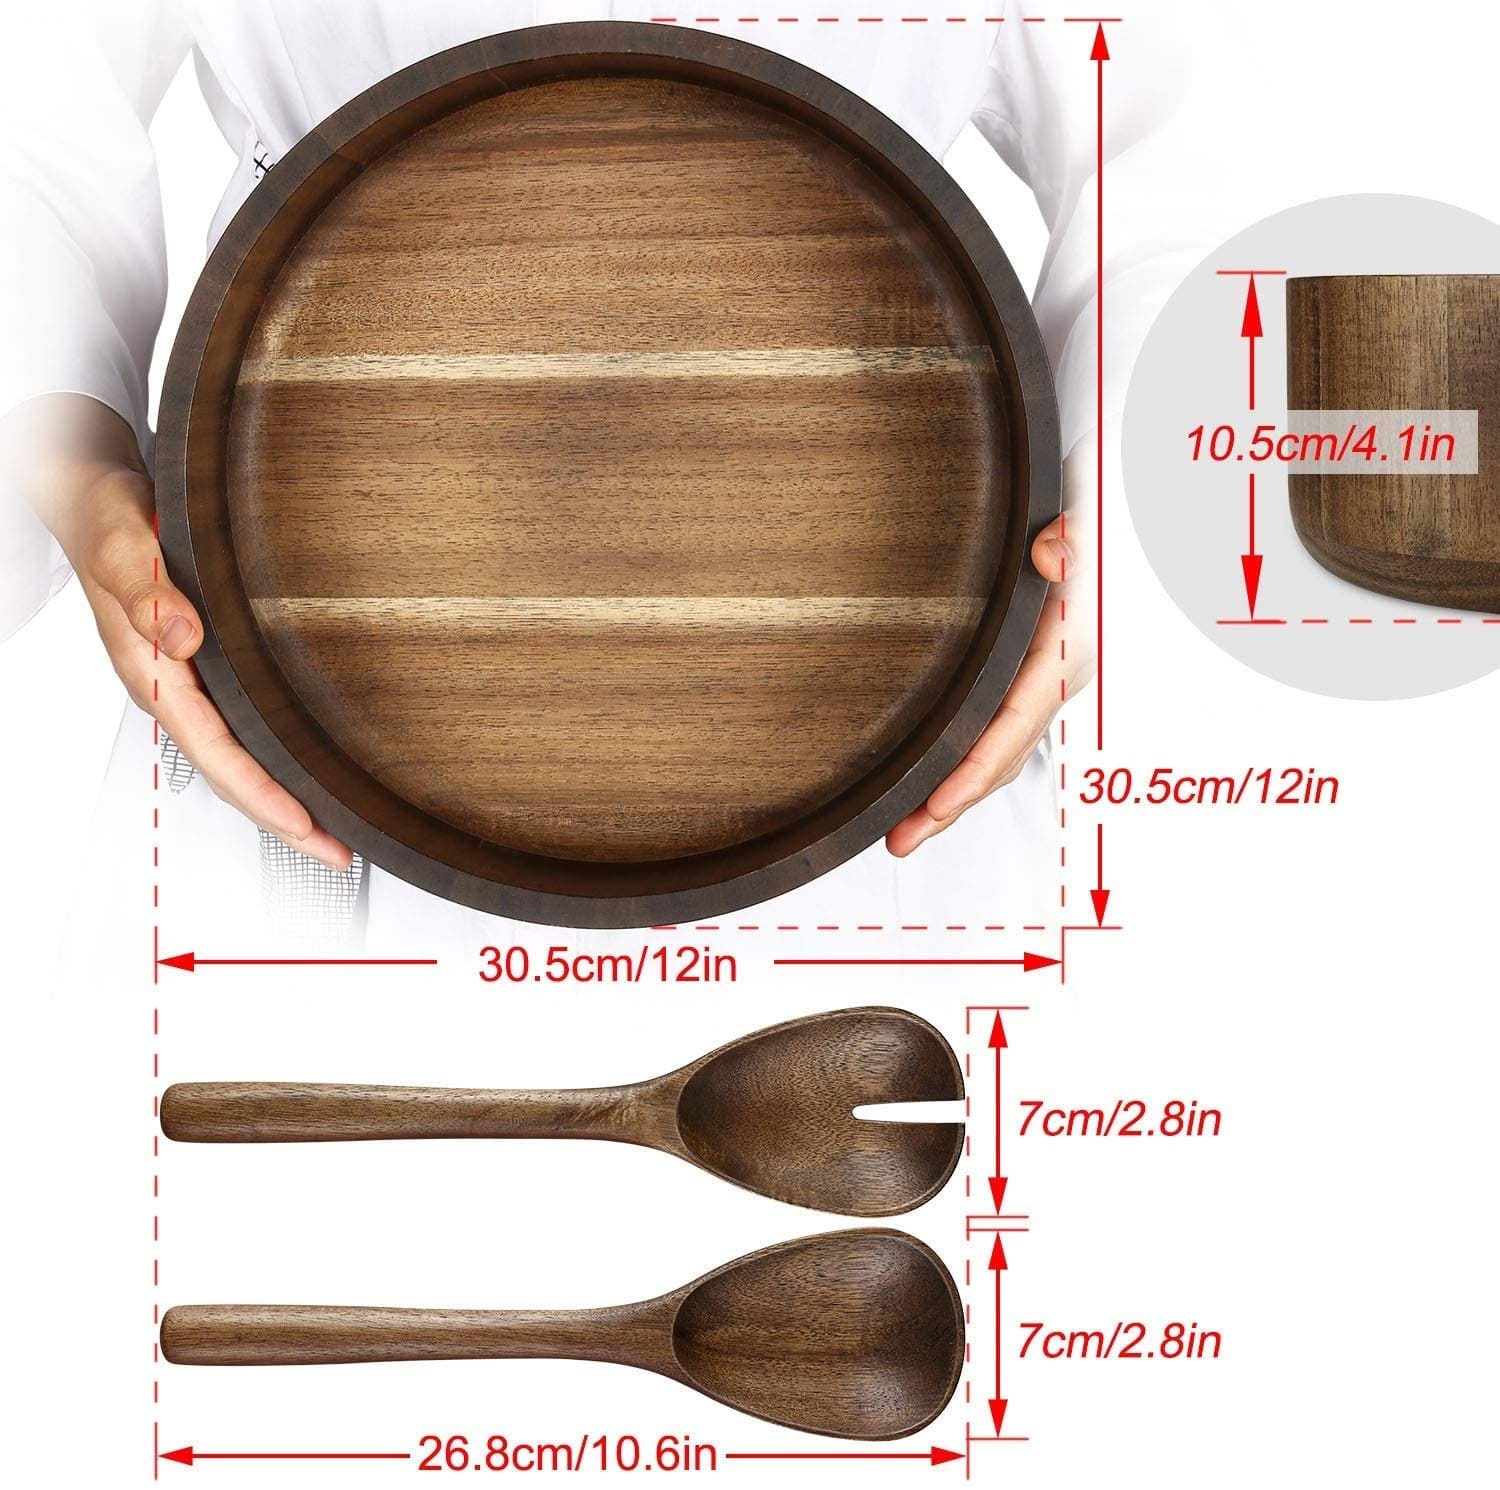
This is important because it will eliminate any misunderstanding on the part of the customer. Remember that episode on The Big Bang Theory where the guys were bidding on what they thought was a miniature time machine and ended up with a full-size one? A product specification image would have prevented that.
-
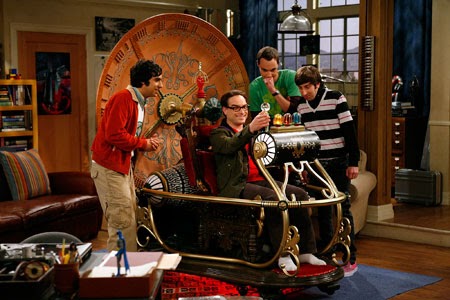
Sheldon and the gang look pretty happy with their purchase here, but they weren’t expecting a product this big.
Lifestyle Photo
The lifestyle photo is a photograph of your product being used in everyday action.
If you’re selling garlic presses then it would be a photo of the garlic press being used around the kitchen. If you’re selling yoga mats, it would be a picture of the yoga mat being used in a yoga studio or at home. The lifestyle photo communicates and reaffirms to the consumer the situations that your product can be used.
-
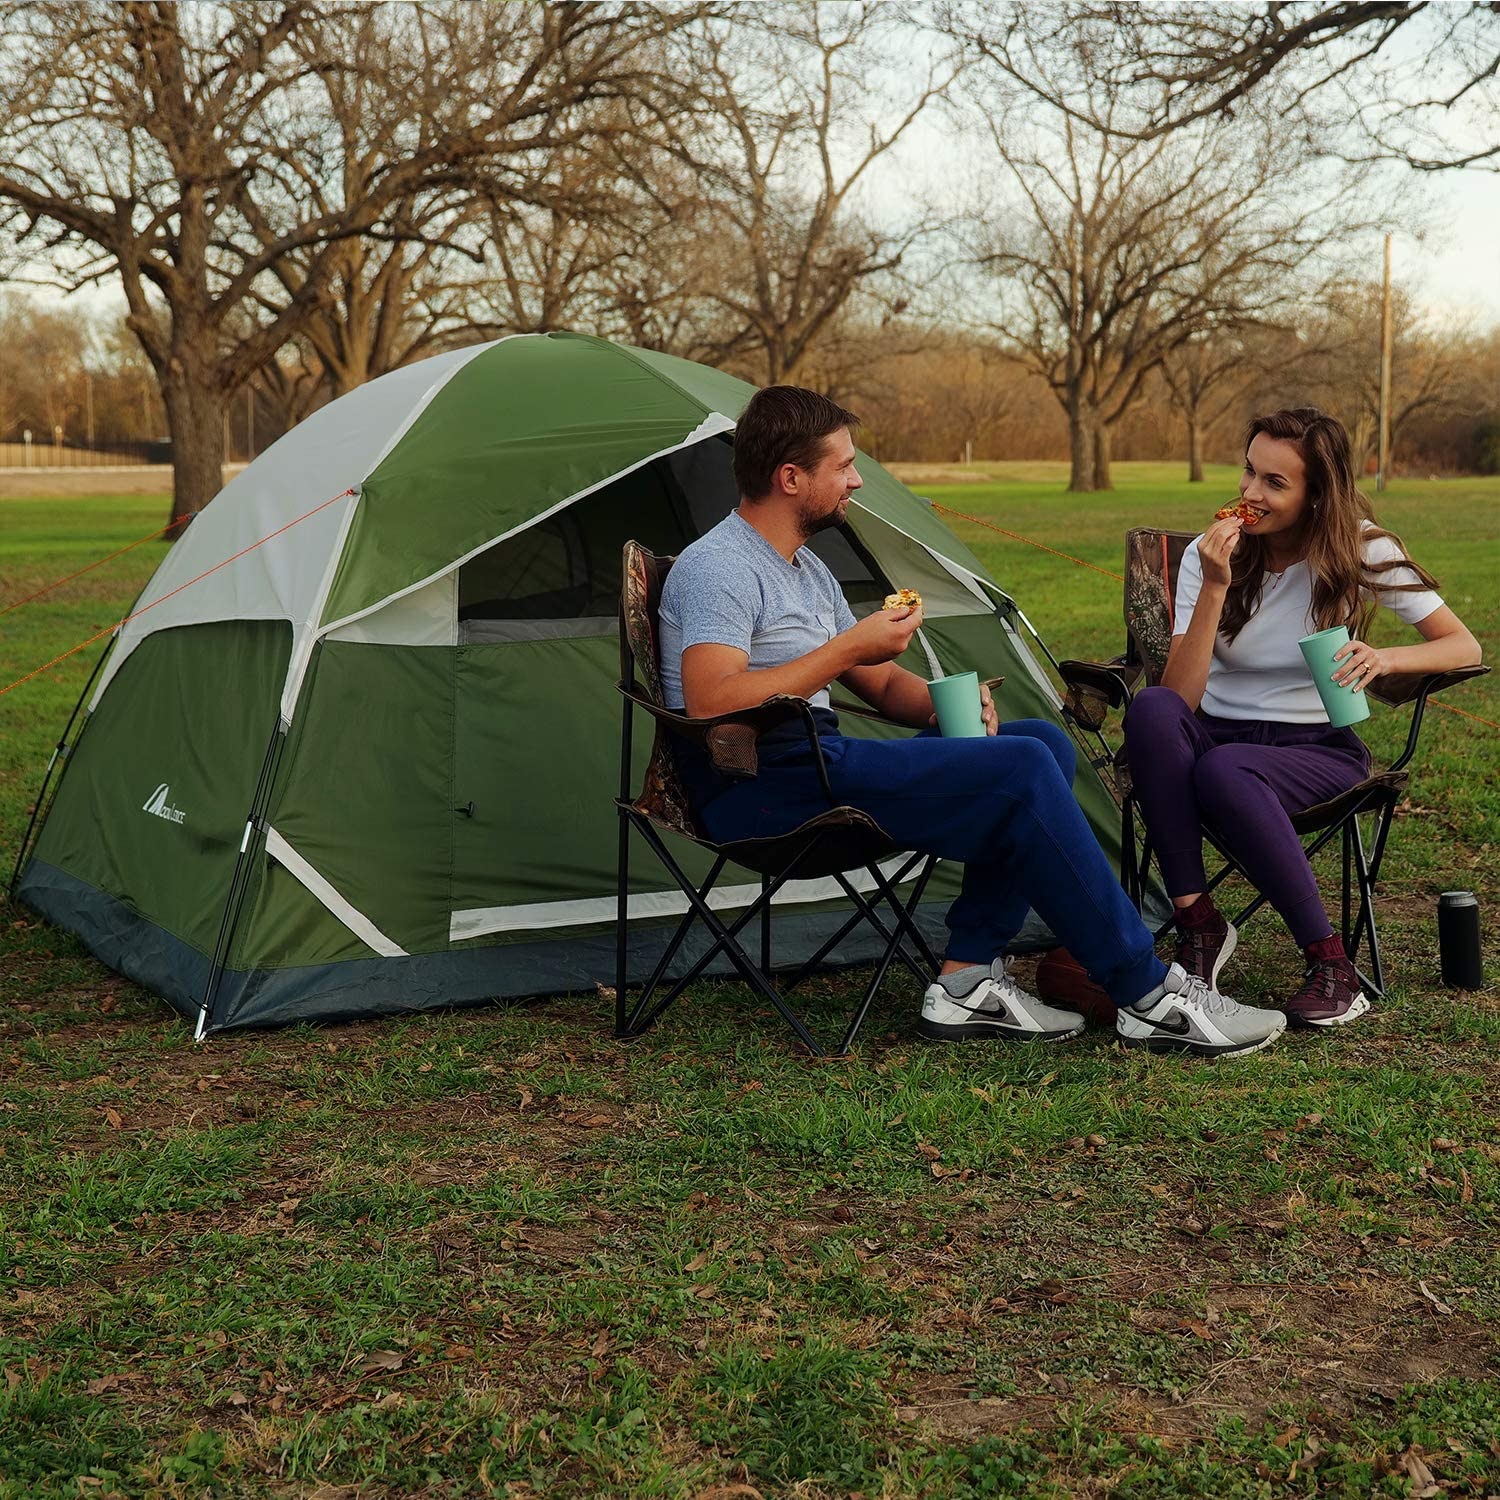
This lifestyle photo shows the product (a tent) being used outdoors.
Can I DIY My Amazon Product Photos?
Unless you’re a professional photographer or you have a knack for taking commercial-grade photos, I would suggest you leave this one to the pros. Your listing images are just too important for conversion to be left to chance.
I highly invest in having these product pictures taken by a professional. You may have heard of the often-cited statistic that 90 percent of drivers think they’re above average drivers. The same thing rings true for do-it-yourself photographers.
In the US, I use ProductPhoto.com which works out to be about $100 per product for a few different shots after all shipping charges (you have to pay to ship the product to them).
I prefer to get my product photography done in China whenever possible to save time. I have a friend of a friend near Beijing but Amazon themselves host a directory of third party services, including photography. If you’re having your products produced in China, having photography done there will save you a lot of time and potentially a lot of money.
When I’m developing a product in China, the first thing I do when production is finished is to have my product sent either to my Chinese photographer or air shipped to my photographer in the USA.
Some sellers employ full-time employees to take care of their listing images while others use freelancers. I actually performed a study on four of the best websites to find freelancers to determine how they differ in terms of quality and price.
Lifestyle Image Hack
Here’s a hack to get very good lifestyle images for very cheap. This is a trick that is being used by many of the best private-label brands on Amazon.
The core of the hack is to take a free image of a situation your product is used in and superimpose one of your product images on top of it.
Let’s pretend you sell a yoga mat.
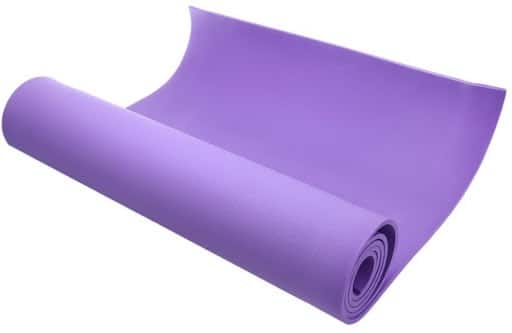
The image is pretty good but it doesn’t communicate exactly what it does. Is this a yoga mat or a doormat?
Now go to your favorite free image site such as unsplash.com or freeimages.com. Find a picture of a scene your product could be used in.
For a yoga mat, I chose a yoga studio. For many of my 4×4 off-road products, I’ll take a picture of a jeep in some off-roading back. Sometimes, you can even find a photo of a similar product being used. Once you have that photo, you simply superimpose your product image on top of it.
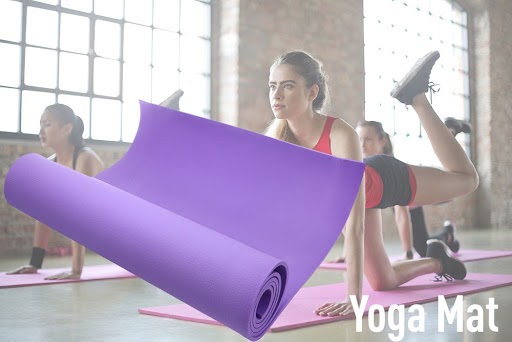
Is it perfect? Of course not. But it converts way better than a simple picture of the product, and it costs you nothing.
Don’t take for granted that people know how your product is used. More importantly, allow your product photography to idealize to the customer how great life will look with your product.
Product with the Packaging
If you’re still packaging your product in polybags, then you should start making some changes. Just as the main image in your Amazon listing gives the first impression when customers are deciding to make the purchase, the packaging gives the first impression when they actually receive it.
Aside from the premium feel, the packaging is also a great selling point.
Remember, people are not buying stuff online just for themselves. Sometimes, they buy gifts. So if you have an aesthetically pleasing packaging (which you should), then include that in your list of product photos.
-
This listing shows customers that the product is gift-ready.
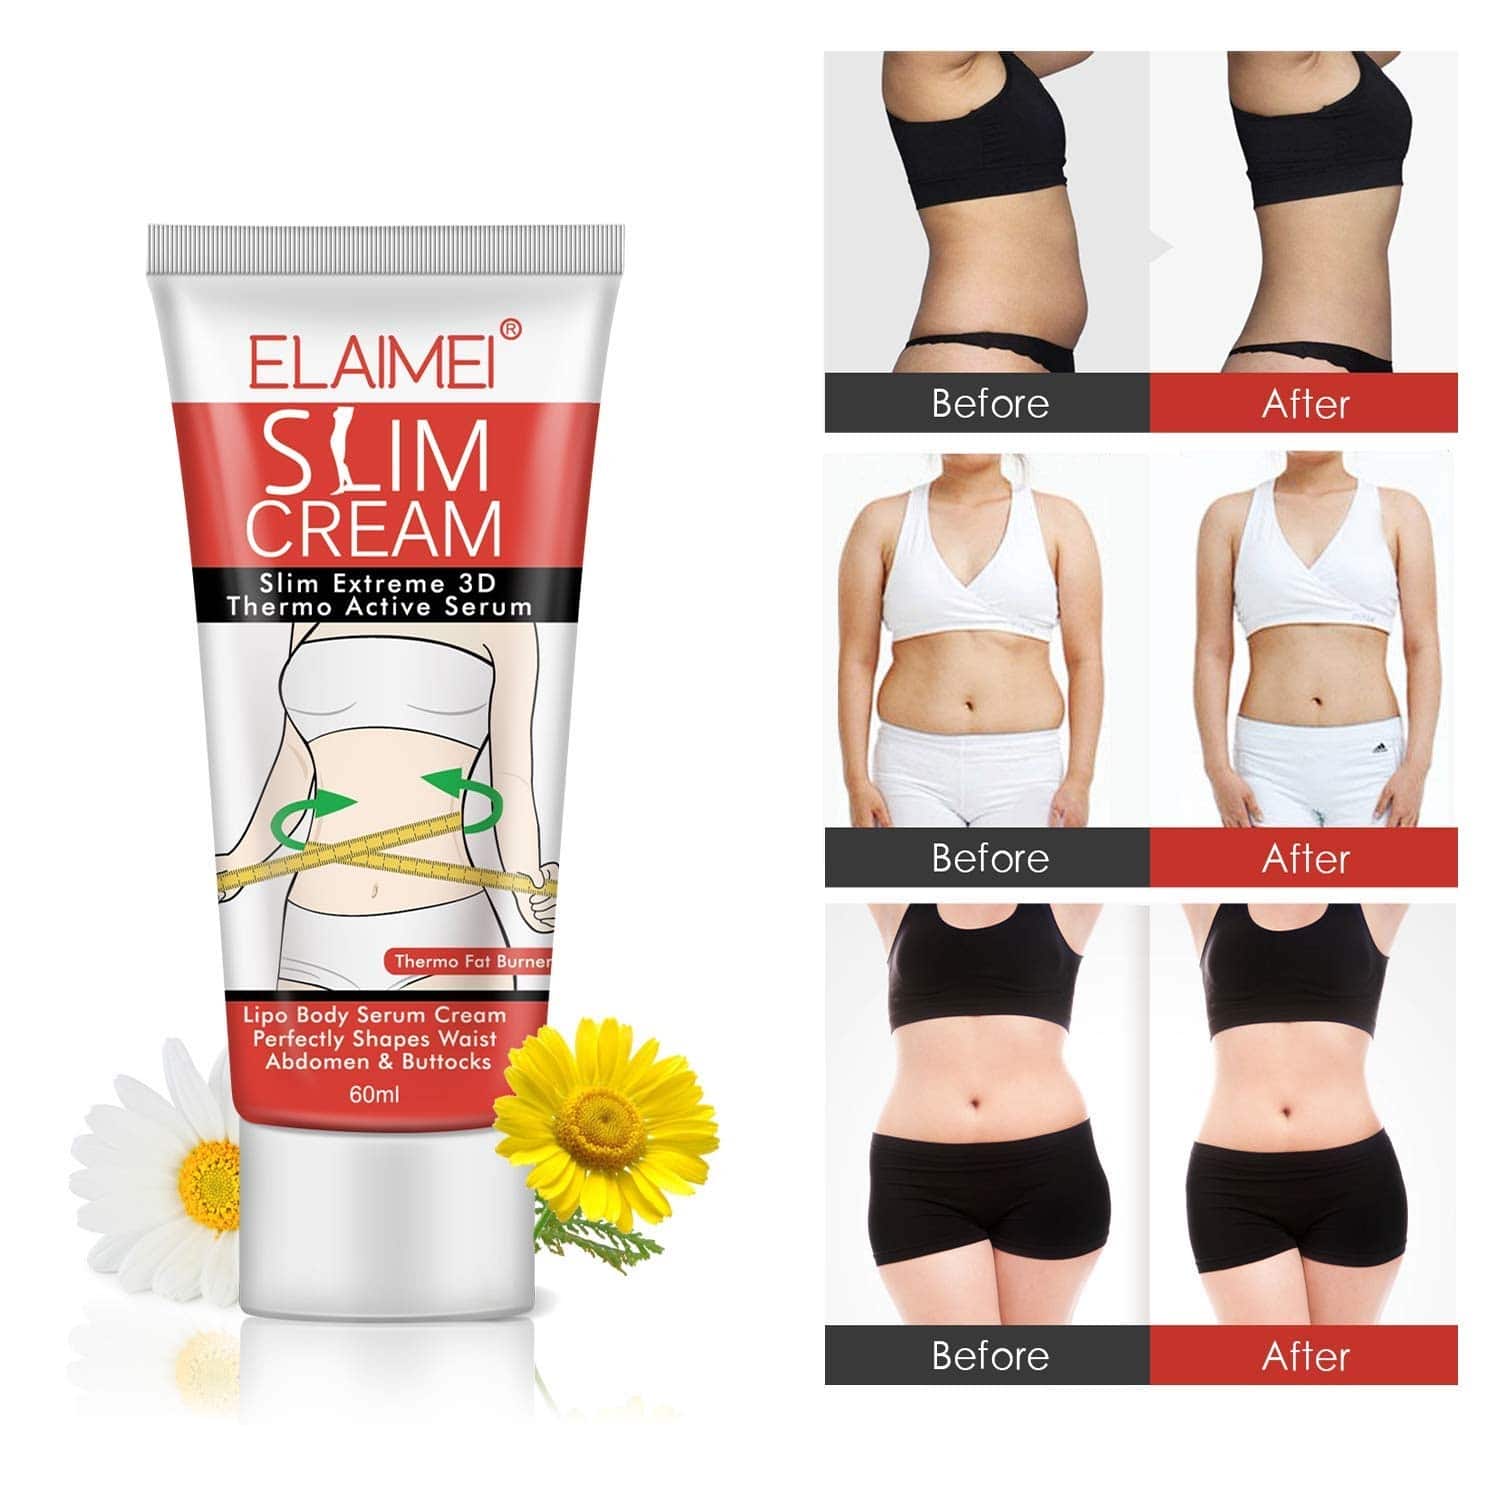
Before and After Photos
If it applies to your product, before and after shots are a great way to exhibit how effective it is. This highlights the benefits (the results) of using your product.
Some Amazon sellers will include only the before and after photos in one image without including the product. But as you can see from the example below, incorporating the product strengthens the connection between the results and the item you’re selling.
Split Testing Your Product Images
There can be many different versions of your product photos. But which one converts better?
Before 2021, Amazon sellers had no straightforward way of determining this, until Manage Your Experiments was updated. However, you are limited only to the MAIN image, so you’ll have to continue guessing which infographic or lifestyle photo is best.
-
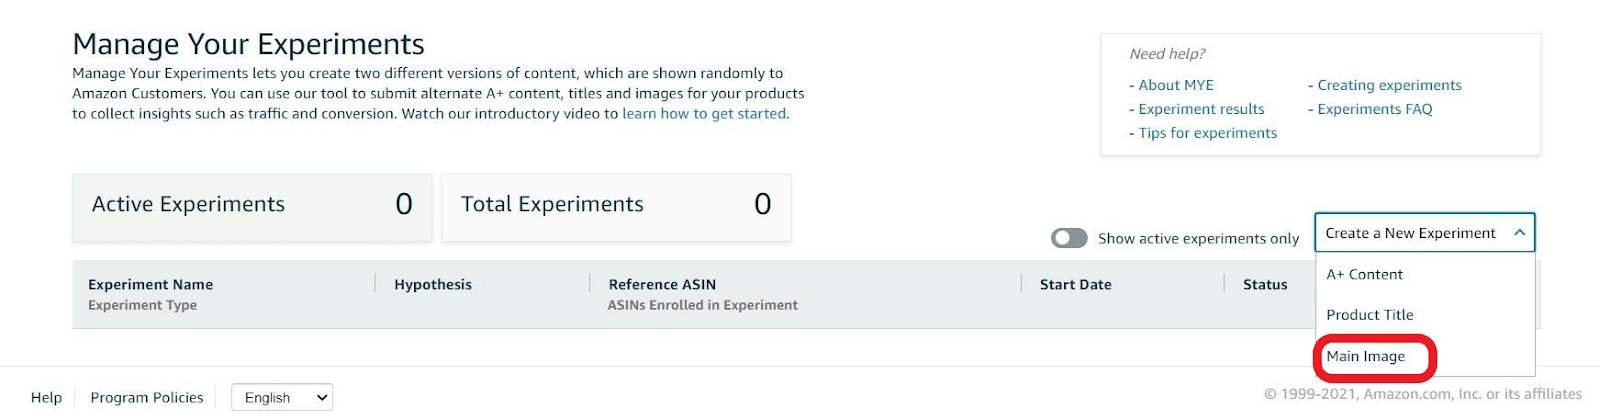
Manage Your Experiments allows you to perform an A/B test on your main product image.
To qualify for Manage Your Experiments, you must
- Be a member of Brand Registry
- Have at least one eligible ASIN
And all eligible ASINs must
- Have published A+ content
- Belong to your Brand, and
- Have high traffic
Maybe Amazon will develop a way to A/B test other listing images in the future. But for now, use your judgment on your other images.
Conclusion
Your Amazon product photos are very important to your conversion rate. It’s important that you upload only high-quality images that not only attract but inform buyers. You should at least have the images discussed above to ease visitors into making a buying decision.
If you have any tips and tricks up your sleeve about product photography for ecommerce sites, please share it in the comments.


Hey Dave, I gave AmzSnap a try and unfortunately I can’t recommend them. While there were some extenuating circumstances with the shoot, almost a month in to the process, I Iost all confidence in their delivery and had to pull the plug.
Two things were concerning from the start. Use of generic gmail addresses for their business. Little to no reference photos available. NDAs are all fine and good but why not shoot some great reference pics for perspective customers? A lack of clear communication was also a problem.
Maybe they are nailing it for other clients, who knows, but for what they are charging, it just didn’t cut it.
Hey Jamie – Unfortunately you are the second person to have a negative experience with them. Will update this article appropriately.
Great photo tips Dave.
I’ve met the guys behind “Virtuous Graphics” and their service is solid. Just ship them a product sample and you get back a full stack of Amazon-ready optimized images and infographics.
Thanks Dave! We had to remove one of he suggested providers here due to multiple negative comments – will replace them with Virtuous :)
I’ve only recently discovered you guys, but I’m devouring podcasts and articles as fast as I can. I’m realizing how amateurish my e-commerce approach has been, and this is the first step I’m taking: I hired a high-end photographer to shoot my products. I can’t wait to see the results when combined with the other optimization of my Amazon listings. Thanks for your content, it is much appreciated!
Glad it helped David!
Hi I have a question. On product specifications, do you think it is a good practice to add arrows (additional to having the information) specifying what and where the width, depth and height are located? like lets say on a chair? arrow for height, arrow for depth…
Thanks!
The more descriptive the pictures/annotations, the better.
Thank you Dave for another great article. How was your experience with the photographer near Beijing China? If positive, can you please let me know their contact info?
He’s near Qingdao and it’s been great :)
Wow excellent photo tips.
Thank you! Glad to hear that the tips are helpful.
Love the way you explain this point: Lifestyle Image Hack, that’s something new which i need to start working on…
thank you Dave for such great content :)
keep up the good work.
cheers,
Manthan
Thanks, Manthan! Glad to hear you enjoyed the content of the article :)