How to Create Super Effective Product Reviews and Videos for Your Ecommerce Site

Ah, product reviews. You've heard they're great for boosting traffic but you know zilch about making them.
Well, we've been there.
In fact, if you’ve read part one of our guide on how to create killer content, you’d see that review articles and videos make up a huge chunk of our content strategy— and it should be part of yours, too.
In this ultimate guide, we’ll walk you through the ins and outs of making review articles and videos, plus share tried and tested tips on how to make the entire process easy-breezy.
If you’re ready, let’s begin!
Topics Covered
The Anatomy Of A Kick-Ass Product Review Article
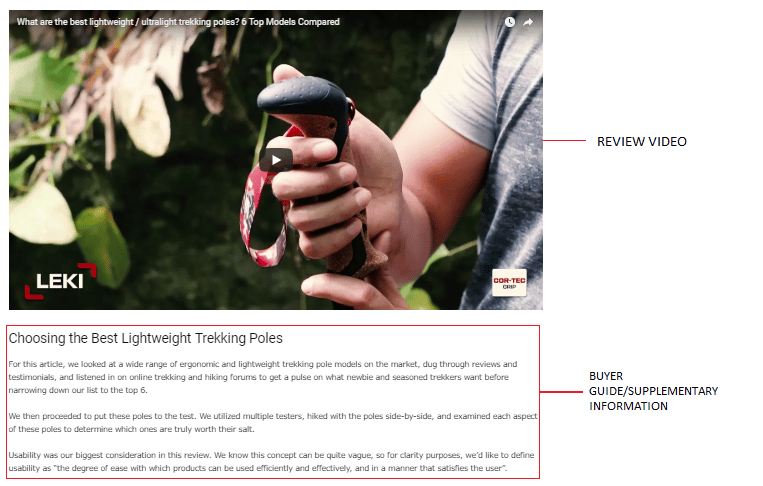
First things first: let’s get to know the elements of a review article. Below you’ll find all the sections that make up a standard review article on our content site, Tactical.com.

- Article title – optimized with medium to long-tail keywords. Maximum length is ideally around 60 characters.
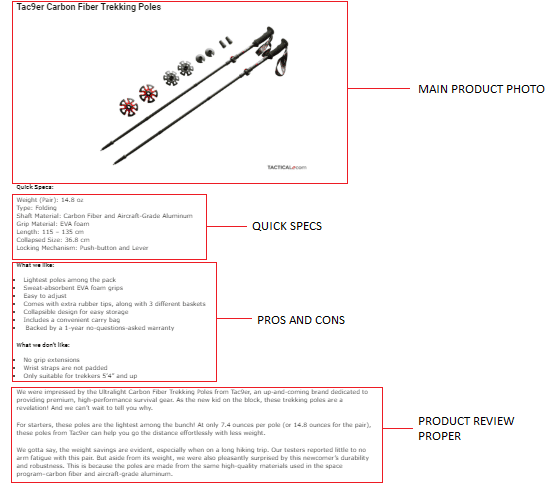
- Quick-glance table – this table has all the quick facts about the product. It usually includes columns for product photos, specs, who the product is best for, and/or a star rating.
- Amazon Affiliate link – a button with an Amazon affiliate link to the products you're featuring.
- Review video – created in-house, this video is uploaded on the brand's Youtube channel and is then embedded on the site.
- Buyer guide/supplementary info – in this part, we outline everything the audience needs to know about the featured product including its functions and benefits, the different varieties available, what to look in a product to best suit their needs, how we did the review, and so on.
- Pros and cons – We outline what we like and don't like about the product based on our testing and experience.
- Main product photo – also taken in-house, our product photo uses a white or transparent background to showcase the product.
- Quick specs – Can't have a product review without specifications.
- Product review – The meat of the matter. This is where we discuss the nitty-gritty details of the product's performance.
Now, these elements aren’t exactly set in stone; some product reviews have all of these, others don’t. It really depends on what your audience finds valuable.
How these elements will look will also depend on the platform you’re using. For your reference, all of the stuff you see above were made and formatted through WordPress. Creating a product review post on Shopify is a bit trickier, but it’s not impossible.
Familiarize yourself with these elements, since we’ll be talking about them at length in the next few sections. For now, let’s talk about why you should bother creating review articles and videos in the first place.
Why Create Review Articles and Videos?
Full disclosure: producing review articles and videos takes a sizable amount of your time and effort.
We say this because all of the review articles and videos that you see across our sites are produced in-house. This means:
- We don’t simply create an imaginary roundup of best-selling products— We actually buy and test everything we’ve featured across all our sites.
- We don’t lift images off of Amazon listings— we shoot both photos and video footage.
- We don’t copy and paste words from existing reviews— we actually test the products.
Again, it takes a village— and a lot of time— to create this type of content. So why should you still do it?
Here are a few reasons why:
It increases organic traffic to your site like crazy
At the end of the day, it all boils down to the amount of organic traffic, right?
As we mentioned in part one, Google loves comprehensive and well-written pieces about a certain topic. The search engine boosts content that genuinely adds value to the audience. Add some choice keywords into top-notch content and boom: you’ve got a winner.
Check out these stats from one of the product review articles we did for Icewraps.com:

This review article about the best cold therapy knee wraps ranks #2 for the term “knee ice pack”, hits about 300 keywords, and saved us about $937 in PPC costs.
Not bad, right?
Creating review videos creates a lot of opportunities for growth
You know who else loves product reviews? Youtube.com.
Since we’ve uploaded our review videos on this platform, we’ve enjoyed quite the success. Check out these views from Tactical.com’s Youtube channel.
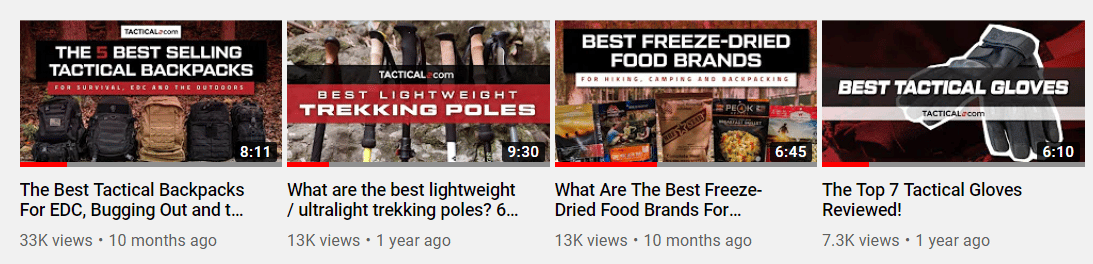
Now, there are a handful of growth opportunities present here:
- We get to establish ourselves as an authority in the niche
- We get to feature our own products in the video so people will get to know them more
- We get to link out to our blog for the audience to access the full review
- We get to earn affiliate income by putting affiliate links on the video description
It’s really like hitting not one, not two, but four birds in one stone.
It’s an awesome opportunity to highlight your products
Still starting out in e-commerce? Just launched a new product?
Cooking up an awesome review article is one of the best ways to get your name out there. You can include your products in the article and compare it against other brands. This is a great opportunity to highlight your product’s advantages against the competition. You can do a quick demo, run through its features, or indicate who its best for.
PRO TIP:
Be objective.
If you’re only going to sing praises about your product, you’d lose credibility. Be honest about your findings, and instead of hiding your product’s “flaws”, use them to your advantage instead.
You can also earn extra affiliate income
Another thing that we love about product reviews is that it rakes in a considerable amount of affiliate income. So, while you’re featuring other products on your post, you’re making up for it by putting in affiliate links and earning a bit of passive income on the side.
How To Create Review Articles
So now you know the benefits of adding review articles to your content plan. The next question: how do you come up with a high-quality product review that rakes in the views?
Below we’ve outlined our entire review article process. It’s important to note that there are a lot of moving parts (ie different roles between different members of the team) so some of the steps can occur simultaneously. That being said, we’ll do our best to map everything out as logically as we can.
Are you ready? Here we go.
Step One: Do Some Product And Keyword Research
First order of business: identifying the products you want to review. Now, it’s pretty tempting to just pick whatever product suits your fancy, especially when you’ve got a long lineup waiting in your e-commerce store, but don’t jump the gun.
Before coming up with a shopping list of products, consider factors like:
- Keyword difficulty
- Search volume
- Competing sites and existing content
- The availability of the products
Let’s break these factors down:
Keyword difficulty and search volume
You don’t want to do a review around a product only to discover that it’s got super competitive keywords, or that not enough people are searching about them.
That said, it’s always best to fire your trusty keyword research tool (we use Ahrefs) and do some research about keyword difficulty (KD) and search volume (SV). We’ve outlined this entire process here.
As always, you wanna go for medium to long-tail keywords with low KD but high SV. Doing this ensures that:
- You’ve got a big enough audience
- Your keywords are relatively easy to rank for
- You’re targeting a specific type of demographic or are setting the right parameters for the products
The last point is super important because let’s face it, there are tons of review sites out there and they’re crazy competitive. It’s important for you to niche down early on in the process to avoid getting lost in the throng of review sites fighting for search engine dominance.
For example, let’s say you’re an outdoors company and you wanna do a review about water filters.
Ok, cool.
The thing is, there are a lot of types of water filters out there. What will you focus on? Are you reviewing pump filters? Gravity filters? Survival straws? Who’s it gonna be for? Are you targeting ultralight campers? Families? Solo-hikers? Car-campers? And so on.
You can answer these questions and more when you do your keyword and product research, so don’t skip this part.
Sniffing the competition out
Another thing you wanna take note of is sniffing the competition out. That is, searching for other review articles covering the same product. Think of this process as a small reconnaissance mission and the first step towards creating an awesome skyscraper article.
In this stage, we search for other review articles and do a bit of reverse engineering. We ask ourselves:
- How did these people review the products, and how can we make the process better?
- What are the criteria for judging? What qualities did they look for in a great product?
- What's their product lineup? What should we include or exclude based on the audience we're targeting?
This step isn't a license to plagiarize other people's work. Don't be sleazy. Instead, use this research to get a pulse on the products and the process behind the testing. Check out different product reviews from reliable sites and improve on what they lack.
This is also a great way to build your product lineup. As a rule of thumb, if a product has a high rating in 3 or more different reviews, it's bound to be a good one. If that's the case, take note of it and check actual user reviews on Amazon.
This brings us to our next point: product availability.
Is the product available on Amazon?
So you've checked the keywords, you've done some recon, and you think you've got a solid lineup. Now you gotta check if all of those products are on Amazon since you're gonna be using affiliate links. It's also easier logistics-wise to order everything from one place.
If you've got an offshore team like us, it's also important to note shipping details (for customs clearing) like following:
- Product weight
- Product quantity
- Unit price
- Product description
Once you’ve got that down, all you have to do is list all the items down, select the top 5 (you can do more, if you like), and have them shipped over to you.
While waiting, you and your team can use this downtime to do more research and organize your upcoming shoots.
Step Two: Producing The Content
Putting together a product review article is like a cross between a science experiment and a product shoot.
On one hand, you're gathering data and testing out the products, and on another, you're busy clicking away behind the camera to make sure you capture those test results in the best possible way.
So, how do we go about this science-experiment-slash-photoshoot operation?
Here's an outline of the process:
Initial Review and First Impressions
Once the products arrive, we do the initial review and unboxing. The things we take note of during this process include:
- The packaging – is it packaged securely? Does it come with instructions or a user manual? Can you open it easily?
- The physical attributes of the product – this depends on the product, but we usually take note of the product’s design and dimensions and how these factors would affect its performance.
- Initial feel and first impressions – we do some light testing here, noting the ergonomics and how the product feels and functions. However, we usually reserve stress and drop tests later along the way, since we still have to take product photos.
In this stage, you might also start outlining shot and footage lists for your lifestyle and video shoot. We’ll talk more about those in detail further down the article.
Take Initial Product Photos
After our first impressions phase comes the shooting of initial product photos. We shoot the products in front of a white backdrop so that the image is easier to edit. We also use these images all throughout the article, but it’s mostly for the quick-glance chart that you can find at the very beginning of most of our reviews.
Here’s an example:
Looks neat right?
The best part is you don’t really need to rent out a studio to get shots like these. Our talented team produces everything in-house using a standard DSLR camera, a tripod, two pieces of cardboard, and lots of natural light.
That being said, if you’re planning to do your product shots the DIY way, here are some things to remember:
- Invest in reliable gear. This includes a good camera, a couple of lenses, some basic lighting setups, and a tripod.
- Natural light can do wonders. Our team swears by diffused sunlight beside windows for best results.
- As much as possible, take every shot on a tripod for clearer images.
- Post-processing can make or break a shot. If possible, it’s better to pin down the shot before you try to tweak it.
Of course, if you don’t want to spend so much time learning how to shoot photos or edit videos from scratch, you can always hire someone to do it.
Test The Heck Out Of The Products
Now that we got the clean product photos out of the way, it’s time for the fun part: actually testing the products out and getting dirty.
As mentioned earlier, we like to put our products through different sorts of tests. These tests depend on the criteria we’ve set for the product.
For example, if we’re testing out flashlights, we’ll check out the lumens and beam distance. We’ll also do drop tests for durability, immersion tests to check their waterproof properties, and so on.
Have we dropped stuff from balconies just to test their strength? Of course, we have.
On the other hand, we set separate criteria for products like freeze-dried food, or say, knee ice packs. You get the idea.
Aside from conducting tests and experiments, we also like to bring in experts and consultants to do the testing for us. We want our review to be as authentic as possible, so we let these experts take the products for a spin for a day or two. To ensure that we still get high-quality, objective information, we provide our consultants with answer sheets and survey forms. We then collate the info and include it in our article.
Writing A Script
We consider writing the script one of the trickier parts of this whole process. You have to create it right after you've gathered enough information, but before you shoot video footage so that your creative team can put together a storyboard and shot list based on it.
The script you’ll be making will also depend on the style you want to adopt for your product videos. If you've noticed, most of the videos across our brands heavily focus on the product itself. Here's a sample to refresh your memory:
As you can see, there's no one testing the products out or giving commentary on-cam. Instead, you mostly see hand models (aka trusty members of our team) just showing the product features or highlighting its benefits.
This is deliberate on our end because finding a good rep or long-term brand spokesperson is insanely tricky, expensive, and time-consuming. Asking these folks to stick to a script or have a great on-cam personality? Another potential headache.
By doing our videos this way, we're saving a lot of time, money, and energy while still achieving great results.
To complete the video, all we need to add are the following:
- Voice over audio
- Graphic callouts
- Background music
- Transitions
Now, the question is: how do you write the script for this video format? Here are some tips:
- Keep your script short and punchy. Be mindful of the video's duration, too. You don't want the script to drag on and on. For reference, our videos are usually less than 10 minutes long.
- Focus on the important features of the product. The specs can be added in as graphics instead.
- Stay true to your brand's voice.
- Read the script out loud as you're writing it. Watch out for any snags, awkward sentences, or phrases that are difficult to pronounce. Edit as necessary to make the script as smooth and natural as possible.
Lifestyle Photo and Video Shoot
We take most of our video footage and lifestyle shots on location. This is where your products would truly shine: in a real-life setting— or as close to it as you can get— so make sure to prepare a shot list ahead of time. If you can cook up a quick video storyboard or outline, even better.
Based on our experience, it's best to classify your shots like this, but you can definitely add more, depending on what you need:
- B-Rolls
- Feature Shots
- Panning Shots
Next, you have to make sure that the locale and time match with the brand or products you’re testing. We’ve seen some videos for flashlights that test in broad daylight. Come on, guys. It’s like shooting a sunblock commercial in Nova Scotia during the winter. Let’s use a bit of common sense when picking the locale and coming up with a shoot concept.
Some real-life examples:
- For Icewraps, we can get away with doing lifestyle shoots in the office. At most, we’ll head out to a gym, but it doesn’t require a lot of on-site footage. All we have to do is have someone wear the stuff we’re reviewing.
- Wild Baby is pretty much the same. We converted one of our meeting rooms into a mini studio and shot footage of our Plush Pals there.
- Tactical’s a different story. Since most of the product reviews involve the outdoors and survival, we usually shoot in campsites and trails. This means our team also does a bit of ocular inspection beforehand. Logistics takes a bit of work since it involves a weekend trip into the woods, but it's nothing you can’t handle.
The point is if you’re going to shoot lifestyle photos and video footage, make sure that the location matches your product.
Voice-over recording
Once the shoot is done, don’t forget to finalize your script and record the voice-over audio. Again, you don’t need to buy any fancy equipment. A trusty microphone (USB mics are a good place to start), recording software on your laptop, and a relatively quiet place would do the trick.
Here are some tips on recording top-notch voice-over audio:
- Record in a small, quiet room (in our experience, storage cupboards work mighty fine).
- If you’re recording in a large room, you can dampen the sound by putting blankets, furniture, and other “noise traps” in sharp corners and glass surfaces.
- Get the mic as close to you as possible when recording.
- Speak naturally and enunciate the words clearly. It helps to practice reading the script before you start recording.
- Record a couple of versions or takes so your editor can have more choices.
- Adjust the gain knob until you're happy with how loud it sounds in the recording.
Step three: Putting everything together
The worst is over. Now you’re ready for the easy part: putting everything together. A lot of things happen at the same time during this stage of the process. At this point:
- Our writers will start collating all the information and write the review blog post
- Our multimedia designers will post-process the images, edit the video footage, and add in the audio recording
- Our customer experience team will generate the affiliate links, upload the video on Youtube, and do other admin tasks related to content publication and promotion.
Best practices when writing review articles
When writing a review article, make sure to keep things light and conversational, but be thorough when going over your findings. Take note of the features that people are keen on checking, and make sure to include those in your review.
Objectivity is also the key when writing. You may be tempted to toot your own horn when reviewing your own products (and you can, in a subtle way), but still, try to be as objective as you can.
As mentioned earlier, we don’t recommend that you hide your product’s “shortcomings” or weaknesses. Be honest and use those “flaws” to your advantage instead, like how Volkswagen did with their revolutionary 1950s ads.
If you’re having a hard time ranking the products from best to the worst, good news. You can actually ditch that format and try going the “Best For” route instead. You can do this by matching each product on your list to the type of customer they’re best suited for. For example:
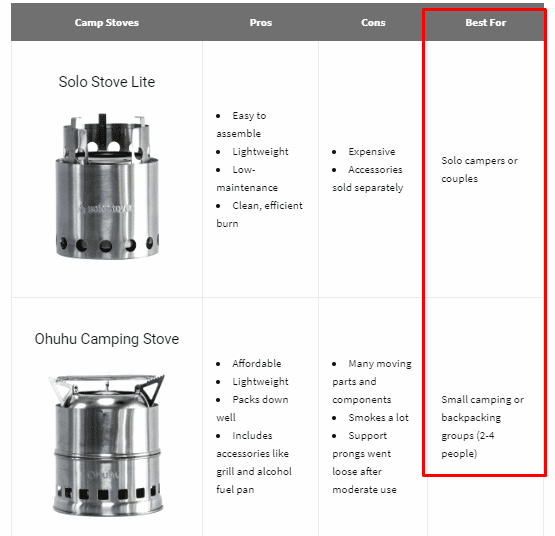
As you can see, we did away with the usual star ratings and just recommended a product to certain audiences. This helps you relate to a wider range of people, too.
It’s also important to format your article well. Most review pieces are quite long, and it can easily intimidate your audience if you don’t format it well. Avoid large blocks of text by breaking it down and using headers, subheaders, images, and other media.
Best practices when editing videos
Editing videos is no walk in the park, so if you’re not confident in your chops, it’s best to leave this to the pros. Still, here are some best practices that we employ when editing:
- Use software like Adobe Premiere Pro and After Effects
- Compile all the footage and edit the video according to the storyboard
- Using stock video footage is fine as long as it matches well with the rest of the video.
- Pick the right background music. There are tons of royalty-free music sites out there.
- Use animations and embellishments as final touches.
Step Four: Publication
Game, set, match! Your content is ready; all you have left to do is tie up the loose ends and hit publish.
Here's how we do things:
- Upload and publish the video on Youtube
- Embed the published video on the review article
- Publish the blog post
- Promote the blog post
There are some best practices to remember at each step. Let's go over them real quick.
Publishing videos on Youtube
Before hitting publish on Youtube, make sure to do the following:
- Spruce up your channel’s header image, add links to your social media accounts, and make sure your About page talks about the value you're giving to your audience. Adding a few keywords in this section also does wonders.
- Optimize your video title and description. Do keyword research and sprinkle the keywords in these areas.
- Create a catchy Youtube thumbnail. You can ask your designers to do this, but if you're going the DIY route, Canva works wonders
- Include your affiliate links in the video description or as a pinned comment.
- Interact with your audience. React with a “heart” and reply to comments as much as you can.
Once the video is uploaded on Youtube, you can then embed it in your article.
Publishing the blog post and sharing on social media
We like to do some SEO housekeeping before hitting publish on the blog. Here are some of the things on our to-do list:
- Title should ideally be 60 characters or less
- Optimize your meta description
- Images should be no more than 200kb and should have alt-text
- Make sure to check the right category and select the correct tags
- Use internal and external links as appropriate
- Use affiliate links on the main blog content as well
- All links within the doc should open to a new tab
Once you have all of this down pat, you can then hit publish and share your shiny new product review article on social media!
Congrats, your very own review article and video are now out in the world!
Hiring and training the right people for the job
Feeling a bit lightheaded with the sheer amount of work the whole process involves? Don’t worry, there’s a solution to that problem.
Instead of going at it on your own, you can simply hire people to produce and publish the content for you. This allows you to leverage your time, effort, and resources.
Should you go agency or get someone from a freelance platform like Upwork or Fiverr? It’s cheaper for sure, but having individual contractors for a project like this allows little space for collaboration, especially when they have to go on-location.
Create a catchy Youtube thumbnail. You can ask your designers to do this, but if you're going the DIY route, Canva works wonders.
In our experience, having an in-house team of creatives is the best way to go.
When looking for potential team members, it’s important for you to set some standards. Here are some things we consider crucial when screening for in-house creatives:
Writers
Here’s a rule of thumb: don’t settle for mediocre writers. Your writers do a lot of the heavy lifting for this project, so make sure that they have:
- The stamina to write lengthy articles and to write it well. These pieces can run for at least 2500-3000 words!
- The ability to break complex ideas or specs into small bite-sized pieces that are easy to understand.
- Super strong research skills. They should be able to look into the technical aspects of the product without breaking a sweat.
- Impeccable grammar and writing chops—because Grammarly can only do so much. Your ideal writer must also be able to write according to the brand's tone.
- Great communication and collaboration skills! This is a team effort, so they must be able to pitch ideas, as well as give and receive feedback with ease.
Multimedia Designers
You can get three different guys to take photos, shoot video, and come up with graphics, but if you can find one person who does all three, you’ve basically hit the talent jackpot (like we did!)
Your ideal multimedia designer must have:
- A natural eye for design. They should be able to convey ideas well and turn those ideas into visual assets for your brand.
- Ability to multitask. Skills for this project include: product photography, storyboarding, photo and video editing, and graphic design.
- Proficiency in programs like the Adobe Creative Suite (Lightroom, Photoshop, Premiere, and After Effects to name a few)
- Great communication skills. They need to be able to express their ideas and take constructive critique in stride.
Virtual Assistants (VAs)
Your VAs are essential in publishing, promoting, and tracking your review articles and videos. Make sure that they have:
- The will to help out before, during, and after the production. They're usually asked to model for shoots, or help in designing the sets.
- Insanely strong organizational skills. They should be able to schedule the publication of content across your social media channels, engage with the audience in the comments section, and answer any inquiries. Knowing how to optimize these posts is a plus!
- Analytics skills and outreach skills. Your ideal VA should be able to track and measure the effectiveness of your content.
Over To You
If you made it this far, congrats! Creating review articles and videos certainly ain’t a walk in the park, but they pay huge dividends over time. When done right, they can drive traffic to your site, boost brand awareness, and save you money on advertising costs.
That being said, the process that we’ve outlined here isn’t set in stone. This can still change as we refine our methods. You, too, can tweak and customize it to fit your business.
How will you improve this process? What products are you keen on reviewing? Let us know in the comments below!