How to Launch a Private Label Product on Amazon [62-Step Checklist]

Relevant podcast: E176: Updated Amazon Launch Checklist
Related Reading: Relaunching & Recovering a Product on Amazon When Sales Drop
Product Sourcing
How do you find the best products to build your brand around?
Find a Product With Less than 2,000 Keyword Volume for the Main Keyword
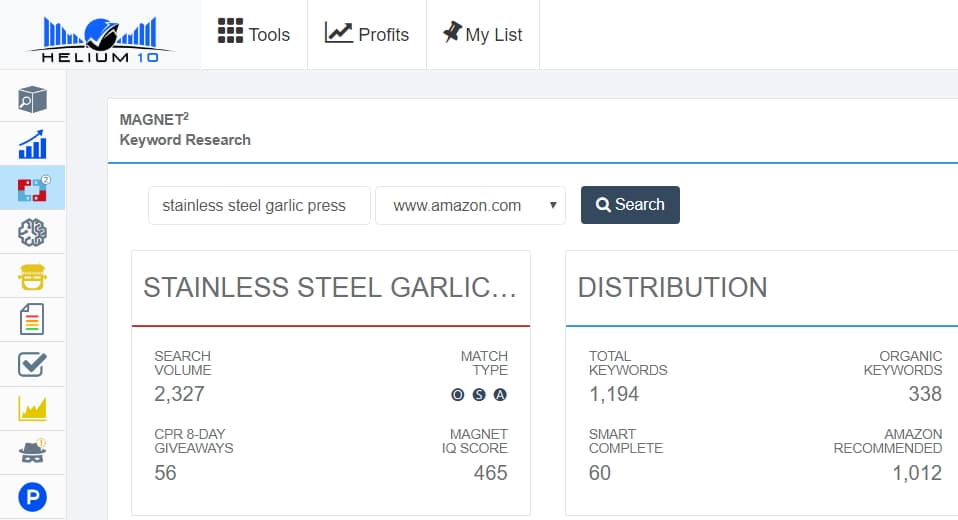
Using a tool like Helium 10, figure out what the main keyword for your product will be. For example, garlic press has 20,000 keyword volume. This is too high. Stainless steel garlic presses only have 858 keyword volume. Now try and source stainless steel garlic presses.
Identify 1-3 Easy Differentiators
What can you do to make your product stand out? Can you change the color, size, or packaging? These are called easy differentiators. Making physical product improvements is even better but can take a lot of time and money to develop.
Get 2-3 Quotes from Suppliers
The best way to get the best prices is to get competing quotes from multiple suppliers. Request quotes from at least two or three suppliers. Ignore the abnormally high or low quotes (there's always a reason) and one of the ‘normal' prices.
Determine the Shipping Terms
What are the shipping terms that you're being quoted in? Are they EXW, FOB, CIF, or something else? There can be significant cost differences between each term so make sure you're comparing apples to apples.
Verify if Your Supplier is a Trading Company or Factory
Is your supplier a trading company or factory? Factories have lower prices but often lower quality. Trading companies have higher prices but higher quality and more selection. It's important to know this vital quality of your supplier.
Product Development & Pre-Launch
You've found the perfect product. Now how do you actually manufacture it to the highest quality standards and ensure it's a smash hit when you launch it?
Request One Carton of Samples
We advocate requesting several samples of a product and getting feedback for it from several customers before going into full-flung production. You can even do a soft-launch on Amazon not only to get feedback but also to get a sense of demand.
Make a Tech Pack/Specs Sheet
Make a note of all of the important specifications of your product including material types, important components/parts, etc.. Compile these into a list. These are sometimes called tech packs or specs sheets. Include these with your Purchase Orders. This will help to increase quality and avoid switcheroos with your suppliers.
Create a Purchase Order and Send to Supplier
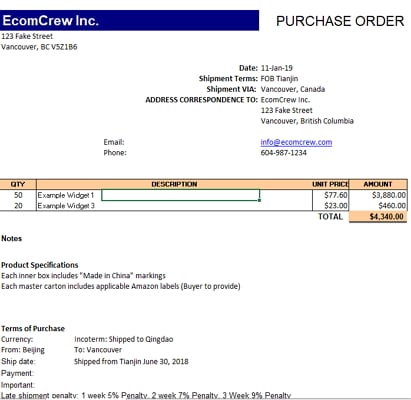
Once all of the nitty-gritty details of your product are worked out, create a Purchase Order and send it to your supplier. Don't just send a plain text email saying you want 200 garlic presses. Here's a free sample Purchase Order that EcomCrew put together that you can download and use.
Make a Deposit to Supplier
Once your supplier accepts your purchase order, make a deposit. Your payment terms should be 30/70 or better (30% deposit, 70% remaining payment with a copy of the Bill of Lading). Make sure the bank info you are given matches the name of your supplier. Never send money to a personal bank account.
Create a UPC Barcode
If you're selling on Amazon or brick-and-mortar, your product will need a UPC barcode. Create these (and/or buy one if needed). Send this to your supplier with your other packaging items.
Create Product Instructions and/or Inserts
No matter how basic your product, you want to include some form of a product instruction manual with the product. This step is often overlooked. Lack of use instructions conveys an impression of cheapness. Suppliers will normally print these instructions for you for free.
If you're including some type of marketing insert with your product, send the artwork for these to your supplier as well.
Create Product Packaging
How are you packaging your products? Are you using full-color boxes? Poly bags with an insert? Plain brown boxes with a sticker on front? Whatever your packaging is, send your supplier the necessary artwork. If you're going with your supplier's default packaging, confirm what type of packaging this is.
Supply Chain
Now it's time to work on all of the nitty gritty of getting your products delivered from your manufacturer and either to Amazon FBA warehouses or your own warehouse.
Add SKU to Inventory Management Software
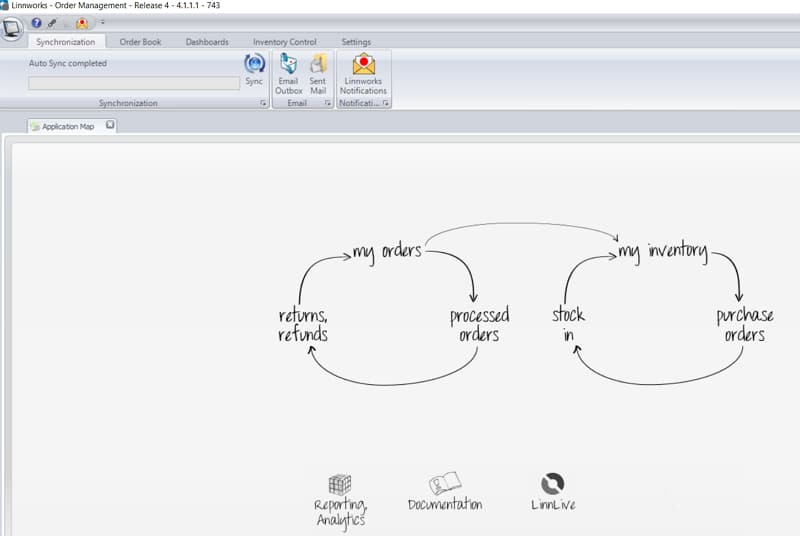
Are you using Inventory Management Software like Skubana or Linnworks (or even Quickbooks' inventory management)? If so (hint: you should be using something if you're not) then now is the time to add the SKU to your database.
Create PO in Inventory Management Software/Accounting Software
Create the PO in your Inventory Management Software and/or accounting software so it can be accurately recorded in your inventory.
Coordinate Delivery Date with Manufacturer
When will your goods be ready for delivery? Figure this out with your manufacturer so you also coordinate a delivery time with your freight forwarder.
Schedule Third-Party Inspection
If this is a new item for you, it's wise to book a third-party inspection using a company like QIMA. See our guide on third-party inspections for more info.
Schedule with Freight Forwarder for Delivery
Who's delivering your goods from your supplier to Amazon and/or your own warehouse? Now's the time to organize deliver with a freight forwarder. Most forwarders will want at least 1 or 2 weeks notice but book early, especially during busy times like Chinese New Year and Christmas.
Save BOL/Commercial Invoice/Packing List
Once your goods are ready for shipment, your supplier should provide you with a Bill of Lading (BOL), Commercial Invoice, and Packing List. You will need these to clear customs into your country so save these somewhere accessible.
Create Amazon Listing
Presumably, this is a new product that needs to be added to Amazon's catalog. You'll first need to add this item as a new item in Amazon before you can actually create a shipment plan for it (see below).
You can fill the listing with lorem ipsum text for the time being – just remember to change it later!
Also, when you're creating your listing, make sure to set the selling date in the future so as not to lose the honeymoon/hall pass period.
Create Shipment Plan in FBA
If you plan to ship your goods directly into Amazon FBA warehouses, then you will need to create the shipment plan within Seller Central first.
Make Final Payment to Suppliers
Hopefully, you didn't pay your suppliers 100% upfront. If not (and assuming you don't have credit with them) now is the time to make the final payment to them, probably 70% if you're on 30/70 payment terms.
Pre-Launch
Before you launch your product there are several steps you want to take to ensure a successful product launch.
Identify Influencers and/or Ship to Them
Part of our product launch plan includes getting our products into the hands of influencers who will (hopefully) promote our product to their audiences. We will have assembled a private list of influencers over the years but check out FameBit if you don't have your own list.
Review the Potential Keywords
What are the top keywords for your product? Identify the top 3-7 keywords (we personally use a combination of Google Keyword Planner and Helium10). When you create your product titles, descriptions, and bullet points, keep these keywords in mind.
Have Product Photography/Videography Done
Get your product photos and videos done early (post-production editing takes a lot of time). We prefer to get our photography done in China to speed things up. Make sure to get at least 5-10 different shots of your product.
Edit Product Imagery
Including basic product photography of your product on a white background doesn't cut it anymore. At a minimum, you need an infographic, lifestyle shot, and specifications image. See our article on ecommerce photography here. Including a product video is a great conversion booster.
Listing Creation
After all that work developing your product, it's time to create your product listing (either on your website and/or on Amazon).
Update Product Description/Bullet Points
If you filled your product description and bullet points with either lorem ipsum text or non-optimized text, now is the time to replace it with fully optimized text.
Add Amazon A+ Enhanced Brand Content
If you're Brand Registered then with all of the great product imagery you had created in the Pre-Launch phase, use this to create Amazon A+ brand content.
Add Amazon EBC Video
If you're brand registered AND have a product video ready, you should definitely add the video to your listing as soon as possible.
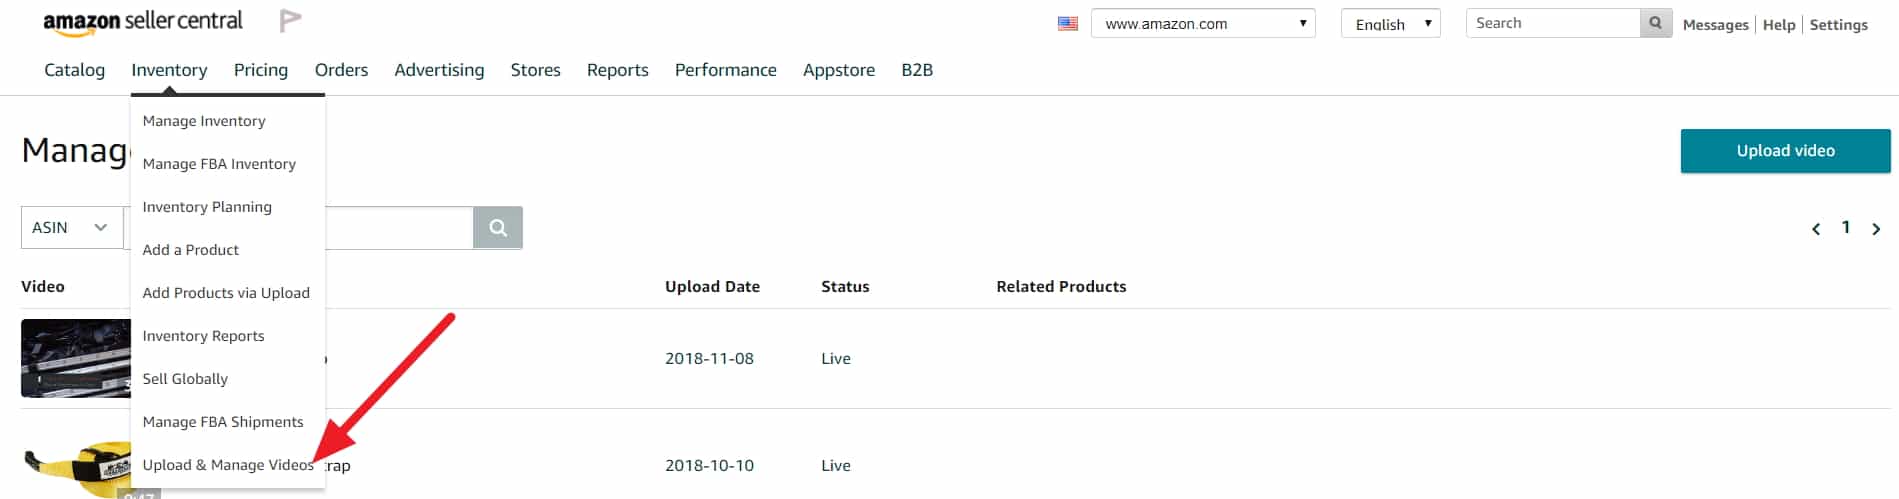
You can find the option to add videos under the Inventory menu (Upload & Manage Videos).
Add Review Monitoring Service
Getting Amazon reviews is critical for your product's success (as we all know) and actively monitoring reviews is a major part of smart review management.
There are a number of review monitoring services out there that will aggregate all of your Amazon reviews in one spot. Our preferred service is Sellics but others exist such as Feedback Genius.
Set up Amazon Autoresponder
We set up a rules-based autoresponder for most of our products. In other words, we send customized emails to customers after purchase depending on which product they purchased. If we have any product user manuals, we'll email customers a copy of these instructions. This helps to foster better reviews for your products.
Add Product to Shopify/Website
Supporting your brand off of Amazon is important (and will, directly and indirectly, help your Amazon sales). Shopify is by far the easiest way to set up an ecommerce site for your brand but there's no shortage of other options such as WooCommerce (for those comfortable with WordPress) and Magento (for those who prefer to self-host their shopping cart).
Create Google Shopping Ads
Most of Google's ad types, in our experience, turn out to be unprofitable. There's one exception though: Google Shopping Ads. Google Shopping Ads are very profitable for nearly all of our products. If you're using Shopify there are a number of free and paid plugins for managing your shopping feed.
Add to eBay
To quote Mark Twain, the rumors of eBay's death have been greatly exaggerated and eBay can still be a source of decent sales (5-10% of Amazon's sales is reasonable), especially in certain categories such as Automotive. I suggest creating a presence on eBay, although don't have it suck a ton of your time.
Building Landing Page for Facebook Contest
Contests are a big part of our product launch process. We use mostly Zipify landing pages along with gleam.io for added virality. Check out our blog post on our entire launch process using contests.
Launch Day
This is it! The day we make our listings live and spend all day refreshing Seller Central and our Shopify orders page.
Set up Sponsored Product Ads (automatic and manual)
Advertising is critical to any product launch. From the get-go, you should have an automatic campaign running to seed your account with advertising data.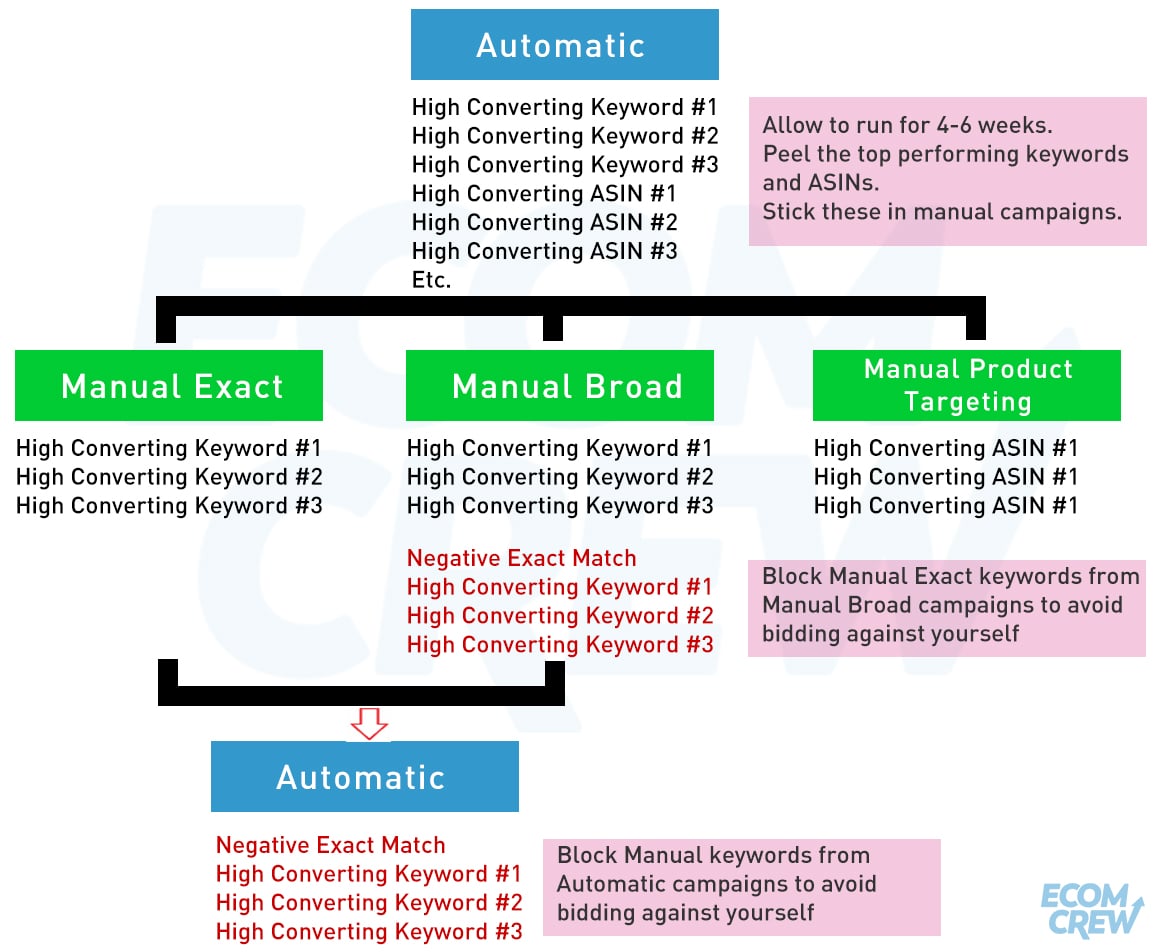
Here's a basic overview of how we structure our account. Check out our article on Advanced Amazon Advertising Strategies for more info.
Set up Product Targeting Ads
Amazon Product Targeting Ads, formally Amazon Product Display Ads, used to only be available to those registered with Amazon Marketing Services. Thankfully it's now available to all sellers.
You'll want to seed your Product Targeting campaign with ASINs generated from your automatic advertising campaign after 4-6 weeks. Again, check out our article on Advanced Amazon Advertising Strategies for more info.
Set up Amazon Sponsored Brands
Sponsored Brands, formally called Headline Search Ads, are the “banner ads” you see on the top of search results pages. Normally they display three of your products.
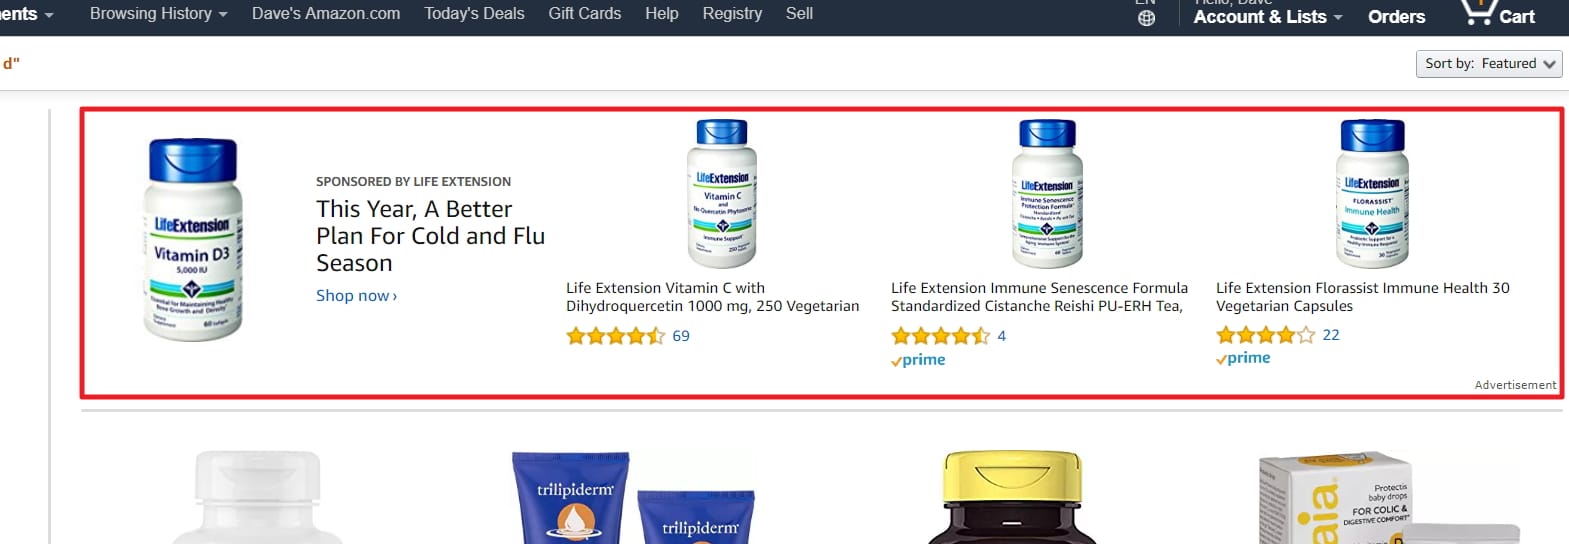
To enroll in Sponsored Brands, you need to be both Brand Registered and have three similar products (at least to achieve reasonable ACoS' on your advertising campaigns). Expect your Sponsored Brands campaigns to perform with a slightly higher ACoS than your Sponsored Products campaigns.
Enroll in the Amazon Vine
In December 2019, Amazon rolled out the Vine program to all sellers.
To use Vine you enroll your product via the Advertising menu within Seller Central. You then give your product away to Vine Voices members (people with a history of providing insightful reviews). Currently, there’s no fee to enroll. You can only enroll products with less than 30 reviews.
Amazon Vine is only open to sellers who are part of Brand Registry and sell on the U.S. marketplace.
Check out our article about What is Amazon Vine and How to Use it in 2021.
Launch Amazon Product Giveaway
Unbeknownst to many, Amazon has a Product Giveaway marketing feature for sellers.
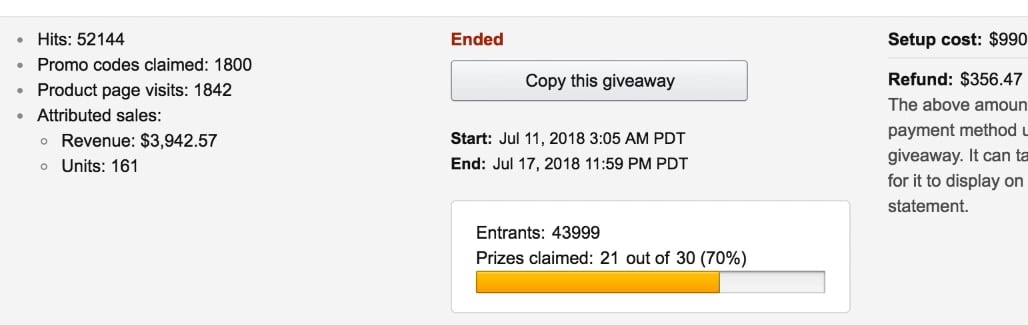
Essentially Amazon customers enter into a sweepstake to win one of your products. The rest are forced to watch a product video. Non-winners get presented a coupon they can use to purchase the item. These giveaways can be very effective or totally flop but they cost nothing, except for the cost of the product.
Check out our article on Amazon Giveaways here.
Add an Amazon Coupon for Product (5%+)
Coupons are another advertising feature on Amazon to help bring attention to your listings. The coupons will appear beside your product in search results. You can select nearly any amount for the coupon, but we suggest creating a coupon of 5% or more. There's some suspicion that adding a coupon may help your organic rankings but this is unconfirmed.
Broadcast Product Launch to Email List
Ideally, along with building an email list, you should also be breaking this list into four segments over two weeks. If you are fortunate enough to have an email list, product launches are a great time to make a broadcast to your email list.
Schedule Social Media Posts
We schedule one month of social media posts (if available) in advance to promote our new product launch. Typically we advertise our products once per week for four weeks.
Email Your List
Finally, and perhaps most importantly, we email our list about our new product.
Our goal with our email blast is to get people to buy on Amazon (later on we may focus on referral-free website purchases). We either link directly to our Amazon listing or bring them to a landing page first. We offer our list a generous discount for purchasing, normally around 25%.
Listing Maintenance and On-Going Work
Once your product is live and chugging along, active maintenance is key to ensuring sales keep their current trajectory or, better yet, grow.
Review Amazon Sponsored Ads – Peel, Block, and Stick
Possibly the most important thing you can do to increase the profitability of your products is to actively engage in peeling, blocking, and sticking. Essentially, doubling down on high-performing keywords and eliminating poor performing keywords. This is something we discuss at great length in our Advanced Guide to Amazon Advertising.
Create Manual Sponsored Ads Keyword Campaigns
Once your Automatic Sponsored Products campaigns have been running for a few weeks, you should take your top performing keywords and create manual keyword campaigns from them which allows more aggressive bidding.
Create Amazon Product Targeting Ads Using Successful ASINS
When you review your Advertising Reports in Seller Central for your automatic campaigns, you will see a high number of sales coming from ASINs. You should target these ASINs in Product Targeting campaigns.
Review Business Reports for Conversion Rate analysis
Through Business Reports in Seller Central, you can see the conversion rate of your product listings (Unit Session Percentage). Typically, below 10% is poor, 10-20% is average, and above 20% is good. Monitor and revise your listings as needed.
Use Amazon Listing Monitoring Software
Listing hijacking and manipulation are unfortunate realities of Amazon. Without using listing management software like Sellerise or Sentrykit you may not find out until you've lost days or weeks of sales.
Check for Suppressed Listings
Review your listings every week or two within Seller Central to ensure you do not have any suppressed listings. You may not always be notified when this happens and it can be caused by something as inadvertent as a missed category field.
Monitor Facebook Ads
If you're using Facebook ads, monitor these either on a weekly or monthly basis. Double down on your best performing campaigns and eliminate poor performing campaigns (if you're not running multiple campaigns then now is a good time to start!).
Monitor Google Ads
Much like your Facebook ads, monitor your Google ads to ensure your CPAs are within your targets. Again, eliminate poor performing ads (unfortunately if using Shopping Ads there's no real way to double-down on good performing products)
Use Split.ly to A/B Test
We use A/B testing software like Splitly to select the best performing titles for our Amazon listings. You can also use the same tools to A/B test pricing, images, and other things.
Conclusion
I hope this list helps you out. If you want to know how to launch a bestselling product on Amazon, we've made a detailed video for you:


eventhought I’m not selling on amazon, but I still get insane value from your post Dave. wish you luck always , thankyou very much man!
Thanks Garry!
I am learning a lot from you. Thanks
Glad we can help :)
Great list Dave! Definitely the most extensive I’ve seen to date.
Thanks Kurt!
Love these kinds of lists, Dave. Thank you!
I’ll be reviewing against my own shorter ones and filling in some gaps!
Glad it helped :)