How to Optimize Your Amazon Backend Fields to Get Ahead of the Competition

There’s a lot of discussion around creating the perfect product listings and other things that buyers on Amazon can see. However, what isn’t seen by the public is just as important.
In this article, we’ll discuss some of the most important Amazon backend fields such as keywords, categories, and refinements, and see how we can optimize them to increase product visibility.
Contents
- What Are Amazon Backend Fields and Why Are They Important?
- Are There Limits to Amazon Backend Keywords?
- How to Choose the Right Backend Keywords for Your Amazon Listing
- How to Optimize Amazon Backend Keywords
- How to Check if Amazon Has Indexed Your Keywords
- Product Category, Refinements, and Browse Nodes
- How to Choose the Right Category
- The Browse Tree Guide
- Conclusion
What Are Amazon Backend Fields and Why Are They Important?
Amazon backend fields contain listing elements that are not seen by buyers on product listings, in contrast to frontend fields that are viewable by the public. They help increase your listings’ relevance to search terms.
To understand this better, remember that while Amazon is an ecommerce platform, it also is a search engine just like Google. Think of backend fields as meta descriptions that tell Amazon’s search engine what your product is and who should see them.
The goal of optimizing your Amazon backend fields such as your backend search terms and categories is to ensure product visibility when somebody searches for a keyword you’re competing for.
There are two ways to edit your backend fields:
- On the “Edit Your Listing” page
- Using flat files
To use the first method, log in to your Seller Central account and click on the following:
Inventory → Manage Inventory → Edit
Flat files, on the other hand, are CSV files sellers can use to upload or edit their listings, including backend fields. To beginners, it can be daunting to work with, but just know that you don’t have to fill out all of the cells.

Flat files can be extremely useful when you’re uploading listings in bulk, for example. But they can be very annoying to work with. If you’re still a beginner on Amazon, you wouldn’t need to master flat files immediately.
Do You Need to Fill Out All Backend Fields?
You don’t. However, it can’t hurt to fill out as many backend fields as you can as long as you’re using relevant keywords and categories. Don’t trick Amazon into making you rank for a less competitive keyword or category because it causes more harm than good.
Other backend fields are not applicable to all sellers. For example, Platinum keywords are only for Platinum merchants.
Here’s a list of the other fields you can fill out to further increase your listing’s visibility to your target audience.
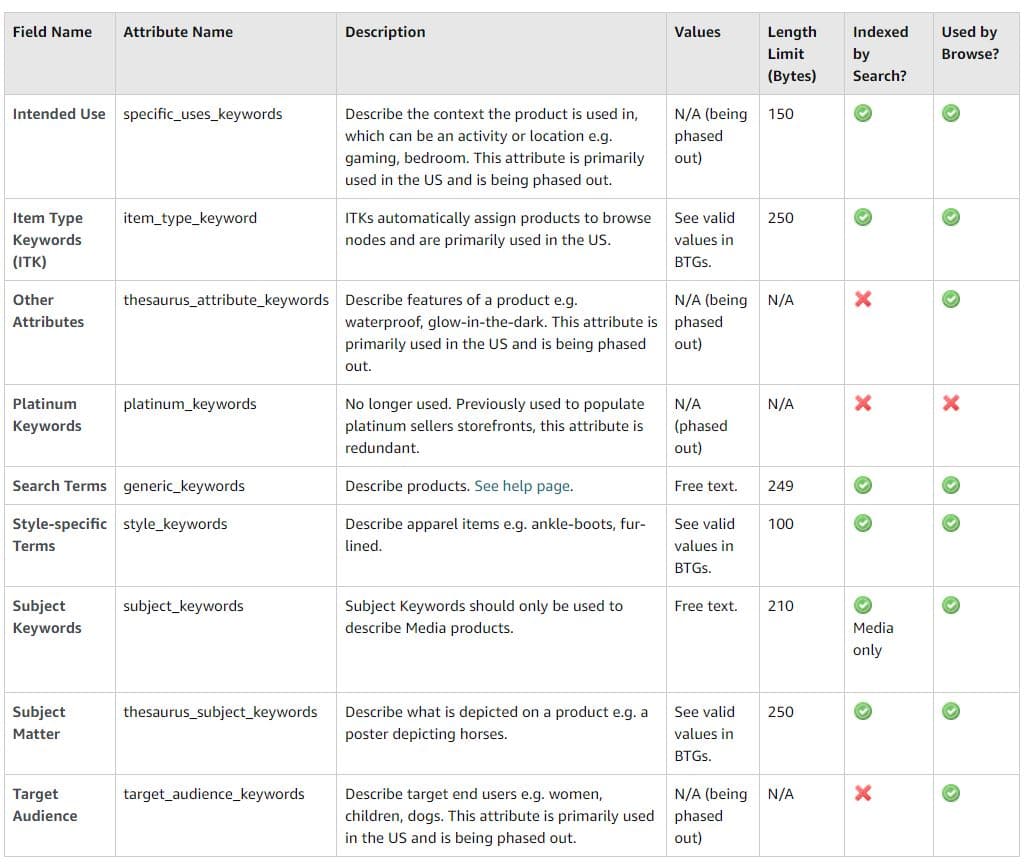
There are also other backend fields that you can see, depending on your product. Explore your account to see what they are. Again, you don’t have to fill in all the fields. Here’s an example of the backend fields for one of our products.
Are There Limits to Amazon Backend Keywords?
Backend keywords are limited only to 250 bytes. This is equivalent to 250 alphanumeric characters, i.e., 0 to 9 and A to Z. But if you have special characters such as the umlaut or foreign characters, they make up more than 1 byte each.
Backend keywords are normally separated by spaces, but you can also use punctuations. These will not be counted in the 250-byte limit.
To make sure Amazon indexes your keywords, use less than 250. Otherwise, none of your chosen keywords will be indexed. But don’t worry about accidentally exceeding this limit because Amazon will warn you if this happens, and you won’t be able to save your changes.

So you might be wondering, Why do I even need to bother with backend fields when Amazon also looks at my frontend keywords?
This is because while there’s so much more real estate in the front end and you can stuff so many more keywords there, it’s not only Amazon’s search engine that’s reading your listing. Your buyers, who are humans and not robots, should be able to understand it easily. And good luck trying to sound like a real human being when you’re stuffing the whole page with keywords.
How to Choose the Right Backend Keywords for Your Amazon Listing
Before you try to find the right backend keywords, look at the ones you already have on your listing. Amazon scans both the backend and frontend of your listing, so do not repeat keywords because Amazon does not consider repeats.
For example, if you’re selling planners, don’t put both “undated horizontal” and “A5 horizontal” as your backend search terms. Both contain the word “horizontal” and you just wasted 10 bytes right there.
In general, you should aim for high-volume, low-competition keywords. Here are some things you can do to find them:
Look at customer reviews and competitor listings.
Take note of relevant keywords your competitors are using that you might have missed. Reviews are also a great way to look for keywords. Keywords frequently used by buyers in the reviews section are likely the same search terms they used in trying to find the product.
Here's a super sneaky little hack. To see what backend keywords your competitors are using, use this URL: https://sellercentral.amazon.com/abis/ajax/reconciledDetailsV2?asin=[ASIN] and replace [ASIN] with your competitor's ASIN. You'll be returned a data file of all the product data on that ASIN. Search for generic keyword and viola! You'll be given all the keywords that competitor is using in their backend keywords.
Use Amazon-specific tools.
Look for free and paid tools like SellerApp. Many of them not only help you generate keywords but also provide relevant information such as search volume and conversion rate. They even have reverse ASIN tools that help you “spy” on your competitors.
Related Reading: What’s the Best Amazon Seller Software in 2021?
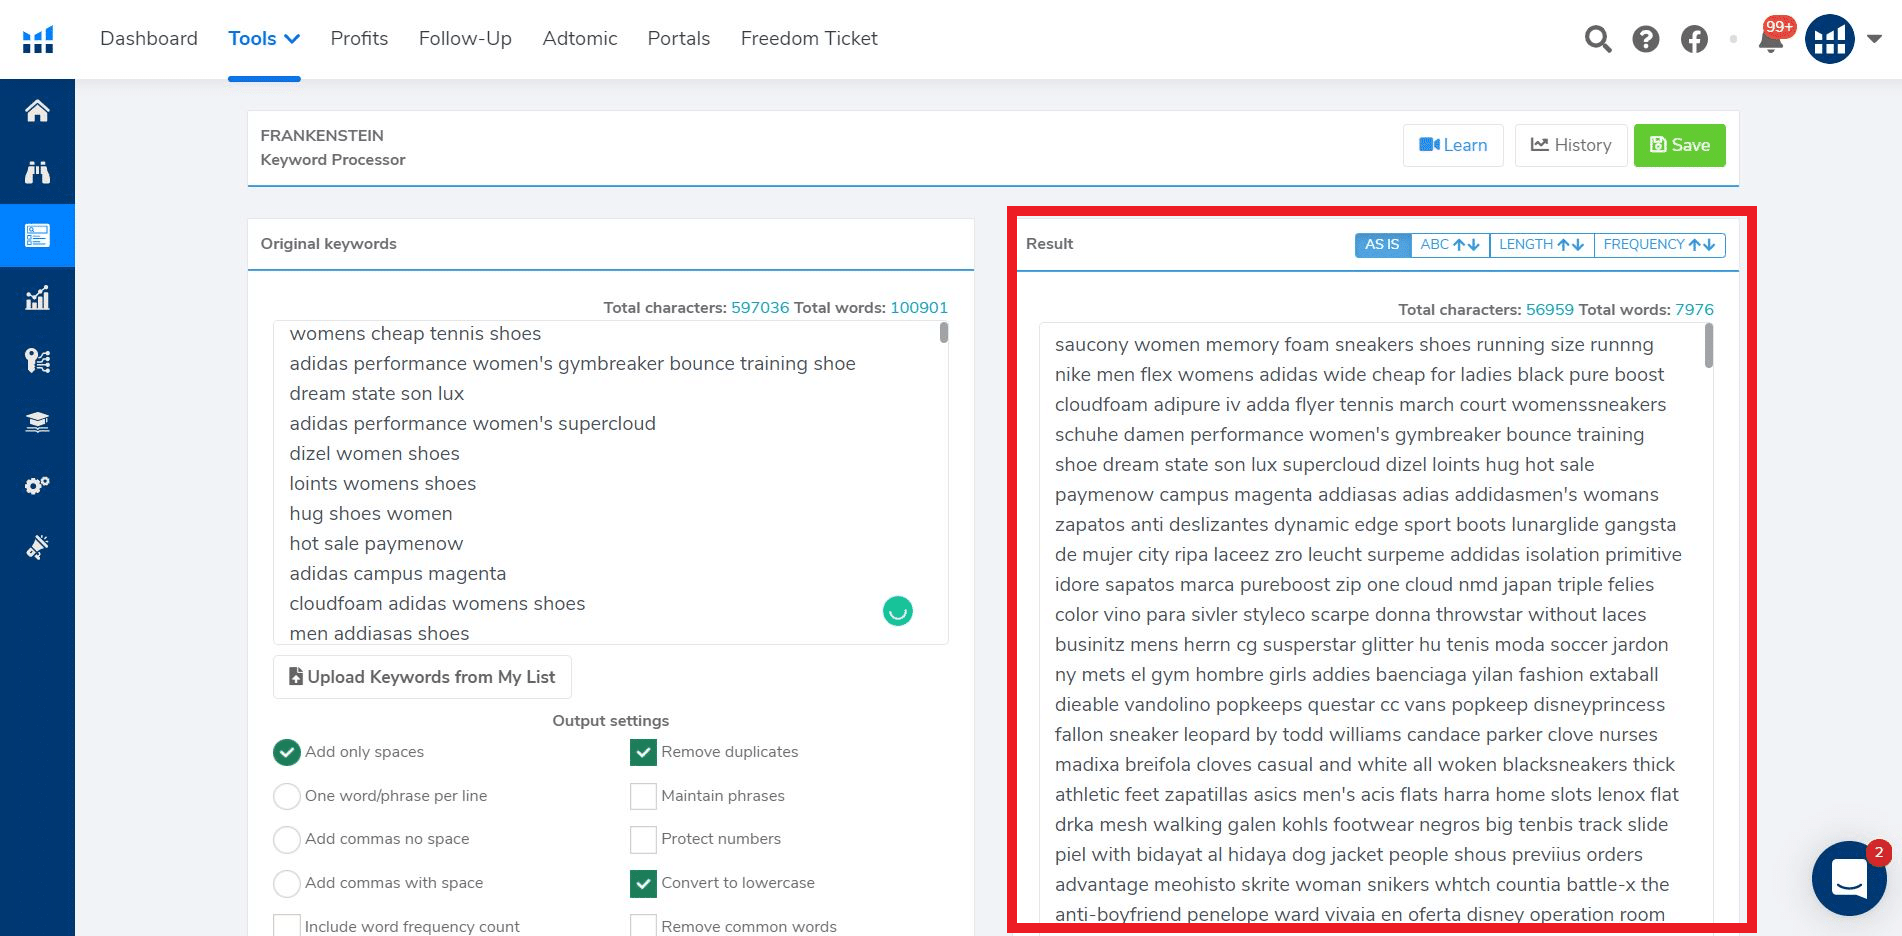
Use Helium 10’s Frankenstein
We call this the lazy man’s way of finding search terms, but it’s helpful when you’re really stuck. Here’s what you need to do:
- Log in to Helium 10
- Go to the keyword research tool (Magnet)
- Type in your desired search term
- Click “Get Keywords”
- Select all of the keywords and click “Export” then “To Frankenstein.” This will open another page.
- On the new page, click “Process.”
This will generate keywords for you, and you can choose which ones are most relevant to your listing.
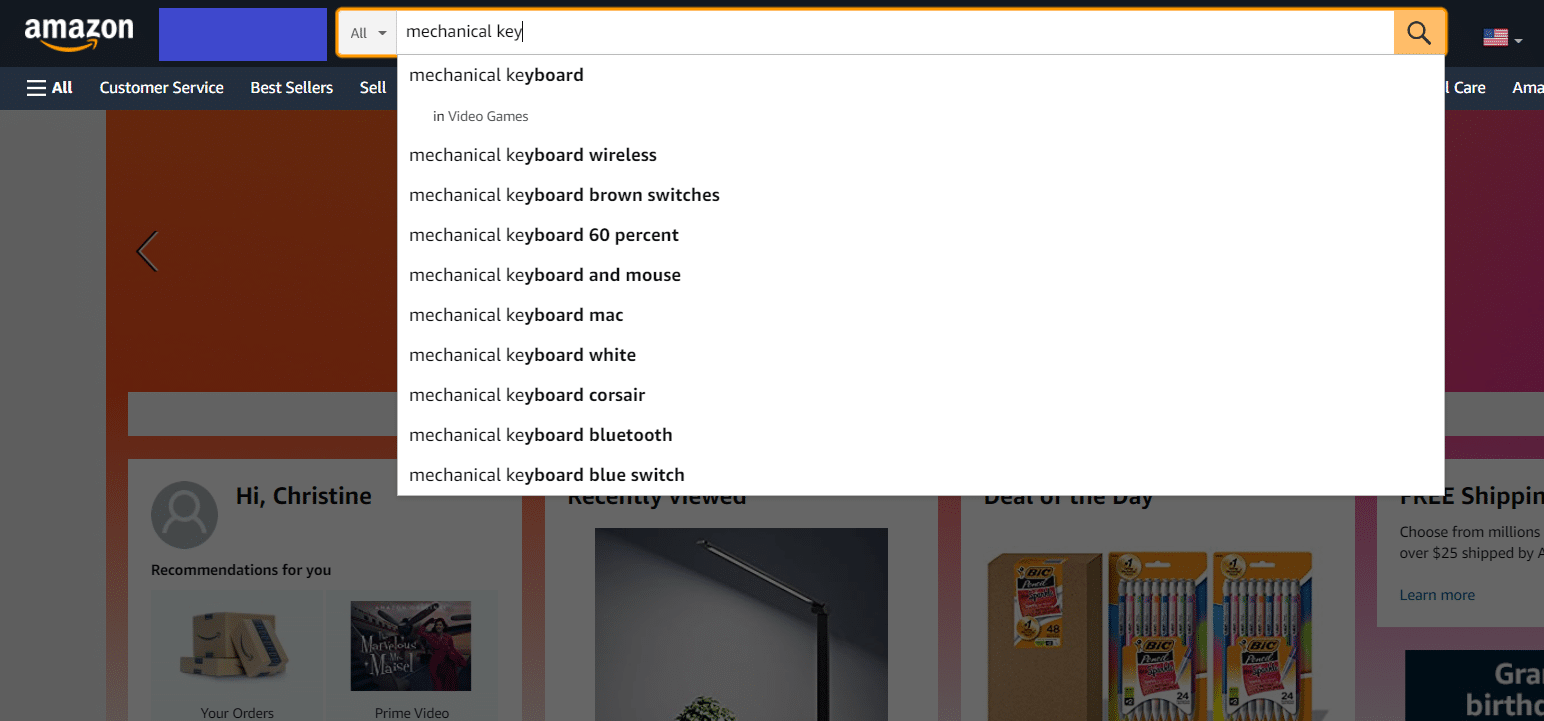
Use the Amazon search engine auto-fill
Just like Google, Amazon provides search term predictions as you type. These are search terms that buyers often use, so take note of which ones you can add to your backend fields.
Check the data of your automatic PPC campaigns
Amazon will give you a report that tells you which keywords are driving the most conversions. Use them as your backend search terms if they aren’t found in your listing yet.
Include foreign language variations
Even though your whole Seller Central is in English, you can reach a lot more people if you include foreign variations of your keywords. Sometimes, foreign variations such as those in Spanish have a higher search volume.
How to Optimize Amazon Backend Keywords
Amazon has guidelines for backend keyword optimization. The most important ones are outlined below.
| Include | Do Not Include |
|---|---|
| Synonyms | Stop words (e.g., “a,” “the,” “and”) |
| Spelling variations | Misspellings |
| Abbreviations and alternate names | Both plural and singular forms (either will do) |
| Spaces to separate keywords | Your brand name and other brand names |
| ASINs | |
| Profanity, abusive or offensive terms | |
| Temporary statements (e.g., on sale) | |
| Subjected words |
You can use all lower case for these keywords because they’re not case-sensitive.
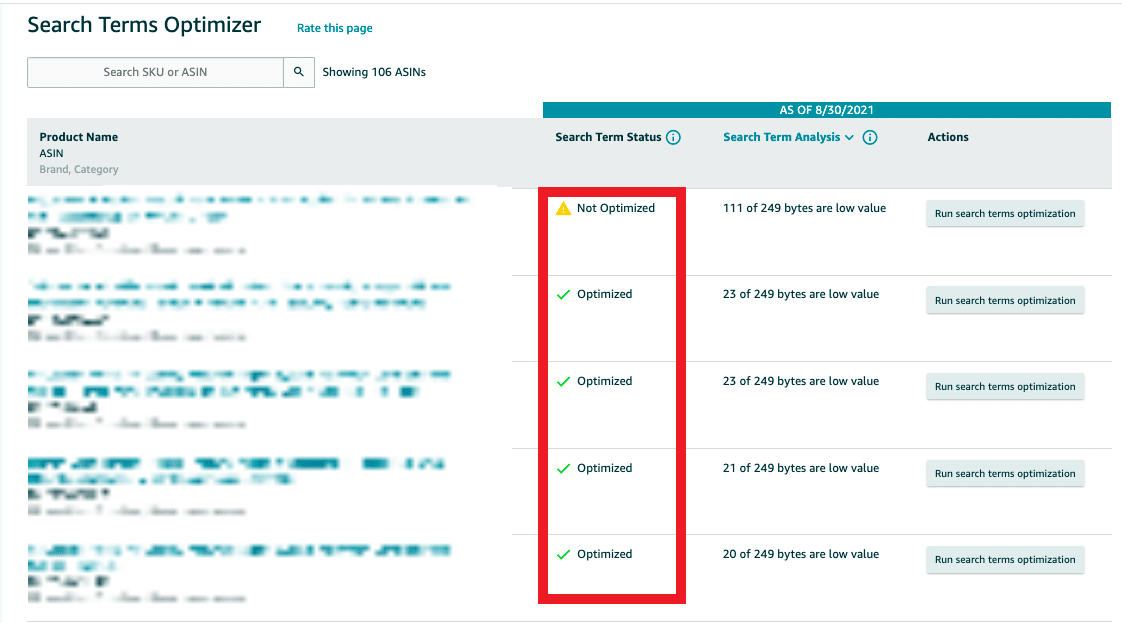
You can check if your search terms are optimized by using the Search Terms Optimizer. This is a feature available to members of Brand Registry. Just go to
Brands → Brand Dashboard → Search Terms Optimizer
How to Check if Amazon Has Indexed Your Keywords
Now that you know how to find the right keywords, you want to know whether they are actually indexed by Amazon’s algorithm.
According to Amazon, when a keyword is indexed, it is “eligible (but not guaranteed) to appear in search results for matching Search Terms.” Don’t confuse it with “ranking,” which refers to your listing’s position in search results.
Here are two ways to check if Amazon has indeed indexed your keywords:
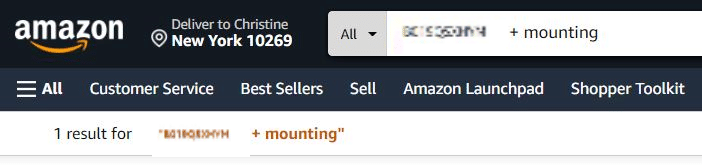
ASIN + Keyword
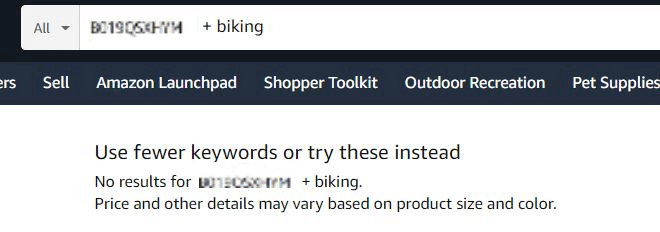
Use the format “ASIN + keyword” on Amazon’s search engine. Needless to say, this is a tedious process. But if you just want to check a specific keyword, this is one of the easiest ways.
If the keyword is indexed, an orange notice appears.
However, if it instead says “Use fewer keywords or try these instead,” then it’s not indexed by Amazon.
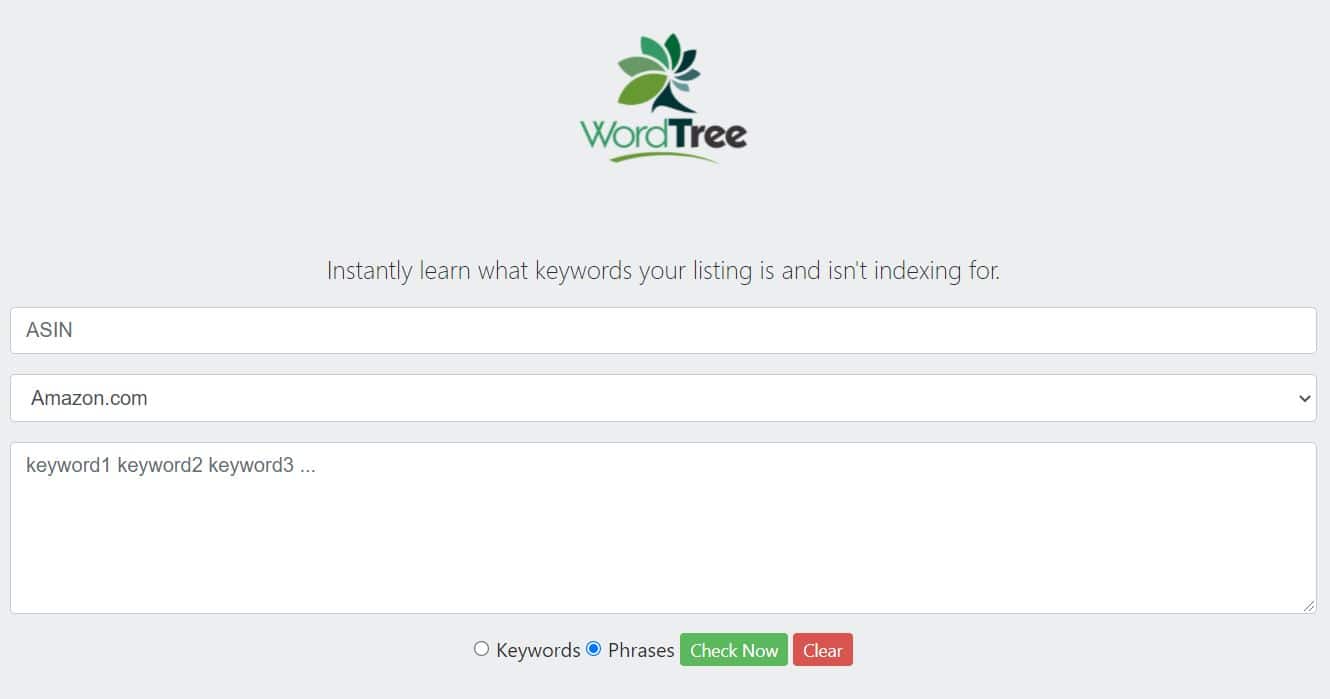
Index-Checking Apps
Apps such as Wordtree and this Chrome extension from SellerApps will tell you if your keywords are indexed or not. It’s easy to use, and you can even download a CSV file.
Helium 10 also has an index checker.
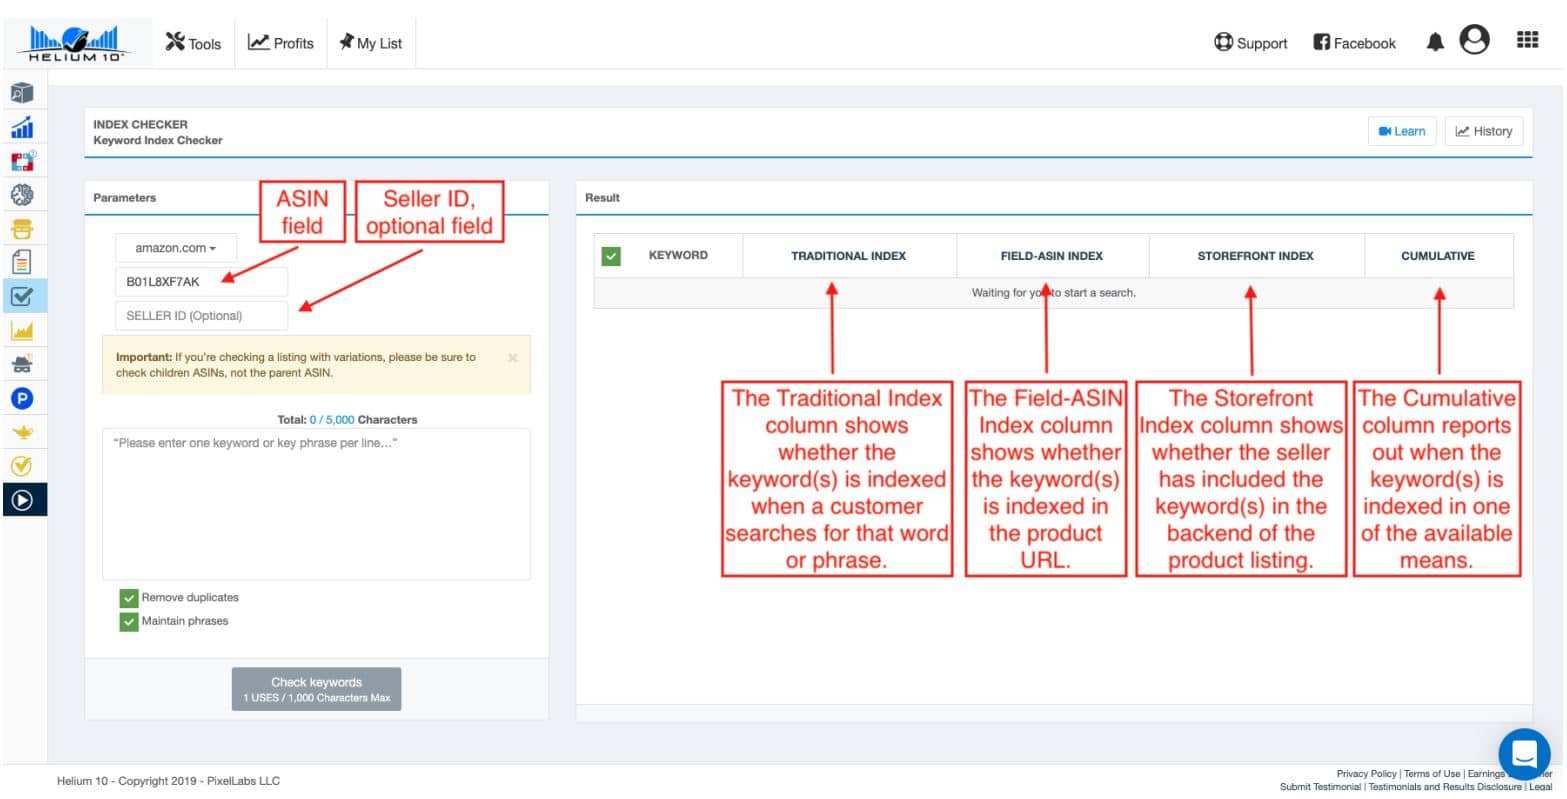
After editing your backend search terms, you have to wait for 24 hours for the changes to apply. So don’t panic when your keywords aren’t indexed right away.
Product Category, Refinements, and Browse Nodes
Aside from the search terms, there are two other Amazon backend fields that can impact your listing visibility on search results: Category and Refinements. These two are often associated and confused with browse nodes, so let’s differentiate them first.
| Category | Browse Node | Refinement | |
|---|---|---|---|
| Definition | Determines what restrictions may be placed on selling products in that category as well as fees | A specific set of items listed on Amazon | A narrowing function that depends on browse nodes |
| Example | Baby products | Cloth diapers | Diaper size |
Categories are things such as Books, Fine Art, Beauty, and Music. Depending on your product’s category, you may have to provide more documentation for your listing to be approved. Amazon has a list of the categories that indicate which ones require approval.
Categories also determine how much referral fee sellers need to pay for sold items. For example, if your product belongs to the Music category, your referral fee percentage is 15 percent.
Browse nodes, on the other hand, can be thought of as sub-categories that help your buyers find your products easier. Products in all categories are divided according to hierarchies, and each division is called a browse. This whole hierarchy is called a browse tree.
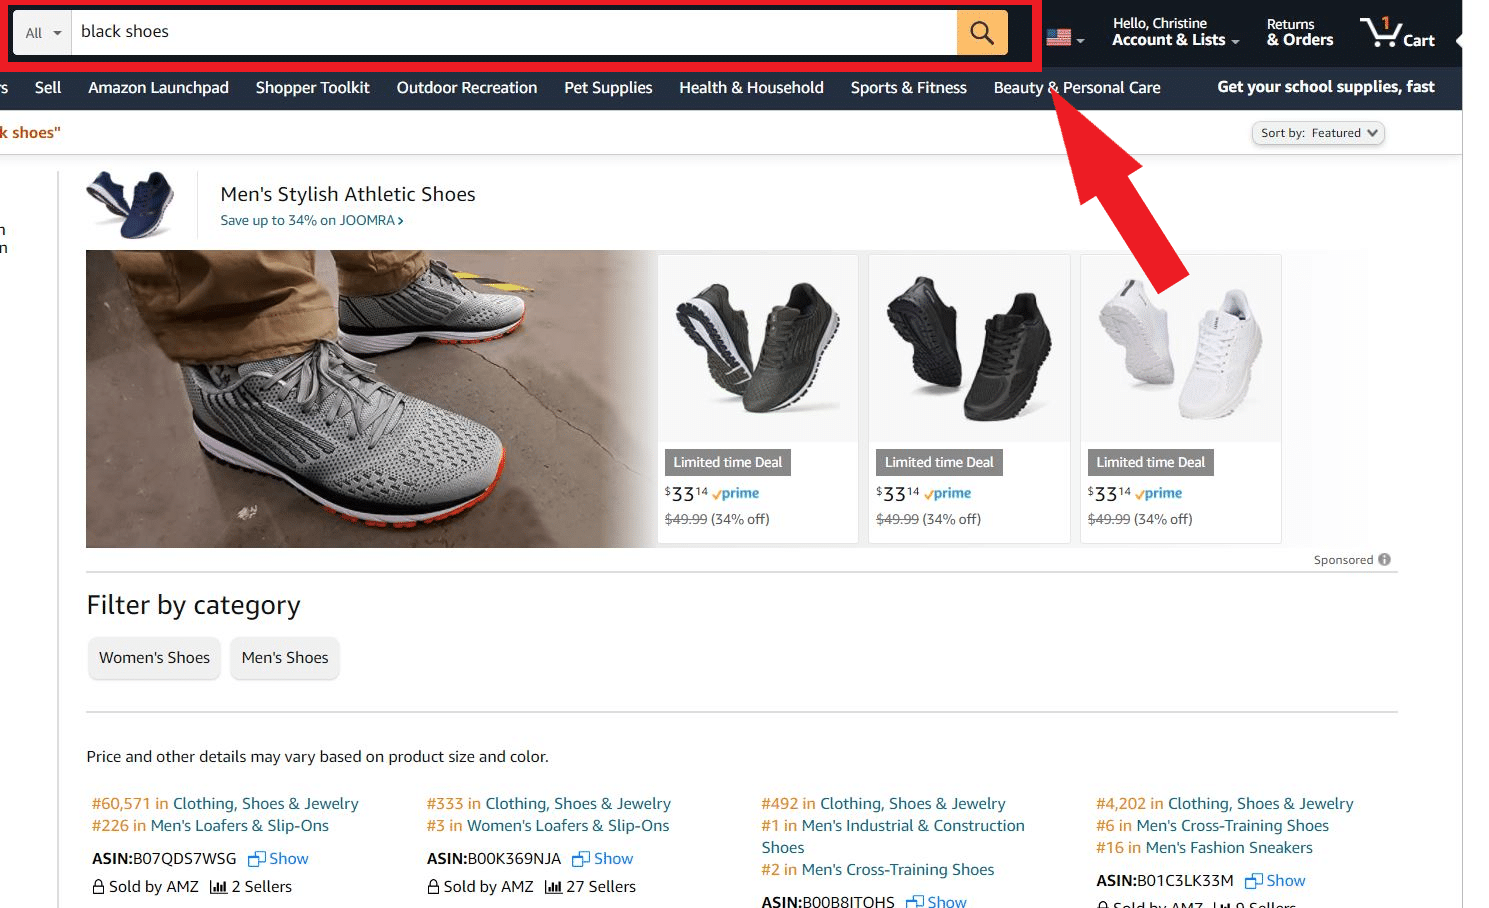
For example, let’s say you’re selling wigs. Under the category Clothing, Shoes & Jewelry, you can follow the following browse path:
Costumes and Accessories → Women → Wigs
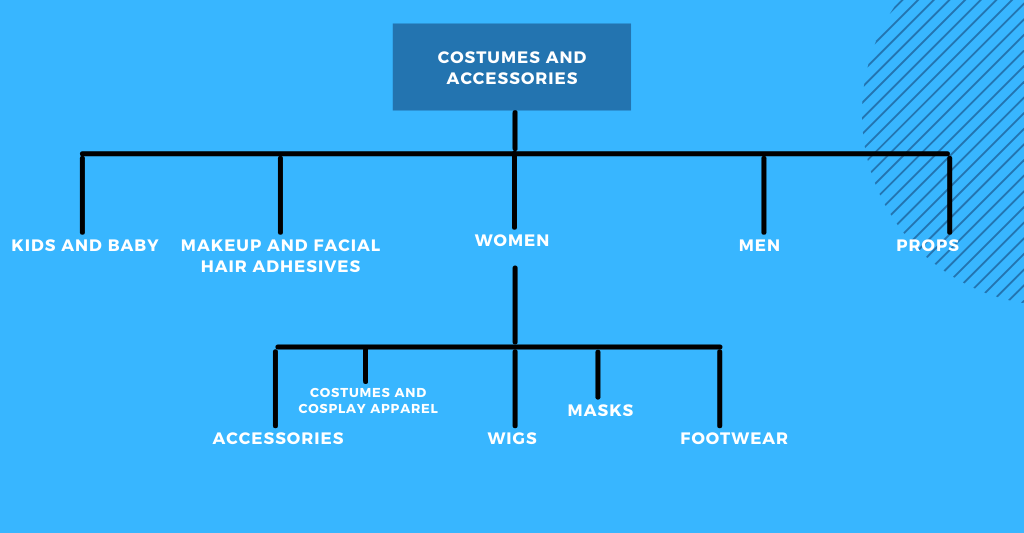
Refinements help further narrow down the buyer’s search. They depend on browse nodes, so if you choose the wrong browse node, some refinements may be disabled. For our wig example, some of the refinements include Hair Color and Wig Hair Type.
How to Choose the Right Category
Here’s the most important rule: choose the most relevant category for your item.
Miscategorizing your products so they fall under a less competitive category can be detrimental to your listing. Sure, it may appear more in searches, but they will be seen by the wrong audience, i.e., people who aren’t looking for your product.
If you aren’t sure which category to choose, look at your competitors’ listings. Amazon also recommends using the Product Classifier, which can be accessed through the following:
Inventory → Add Products via Upload → Product Classifier
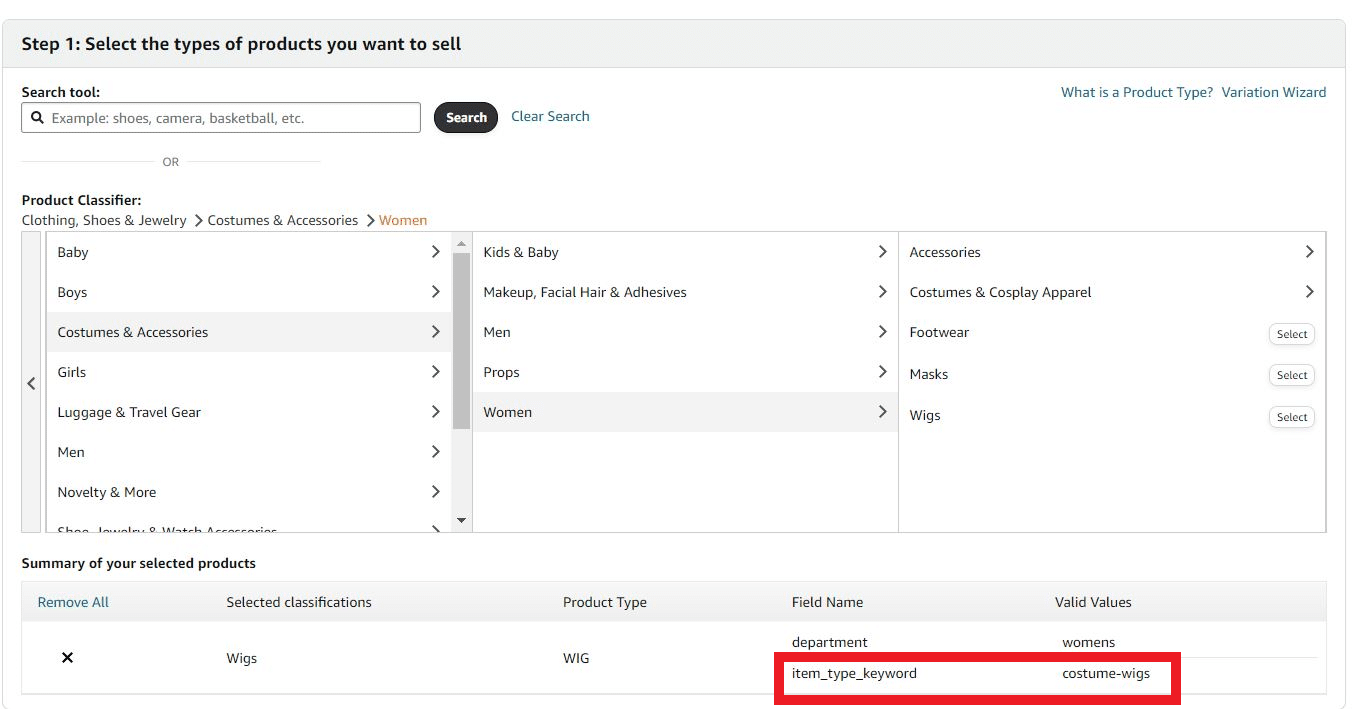
You can browse through the categories and continue clicking until you reach the final browse. This will then give you the Item Type Keyword, which is the narrowest categorization of a product and is required for your product to show up in a certain category.
In our example, the Item Type Keyword is costume-wigs. Now, let’s look at another way to get this data and see if they give the same information.
The Browse Tree Guide
Browse Tree Guides (BTGs) are extremely useful in categorizing your products. They are another way for you to find the right Item Type Keyword. Some BTGs are readily available while others become available only after approval.
Let’s take a look at the BTG from our wig example from earlier:
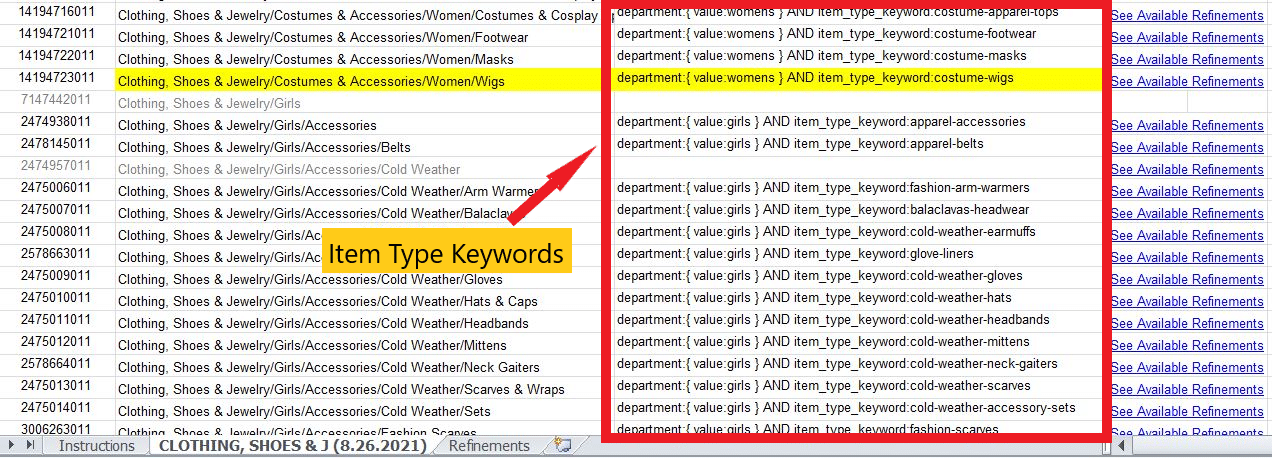
As you can see, this gives us the same Item Type Keyword, which is costume-wigs. You can also see the available refinements in the same sheet. Just click on the link to be taken to the right cells on the next tab.

From here, you can click on the Accepted Values column to see your Refinement options.
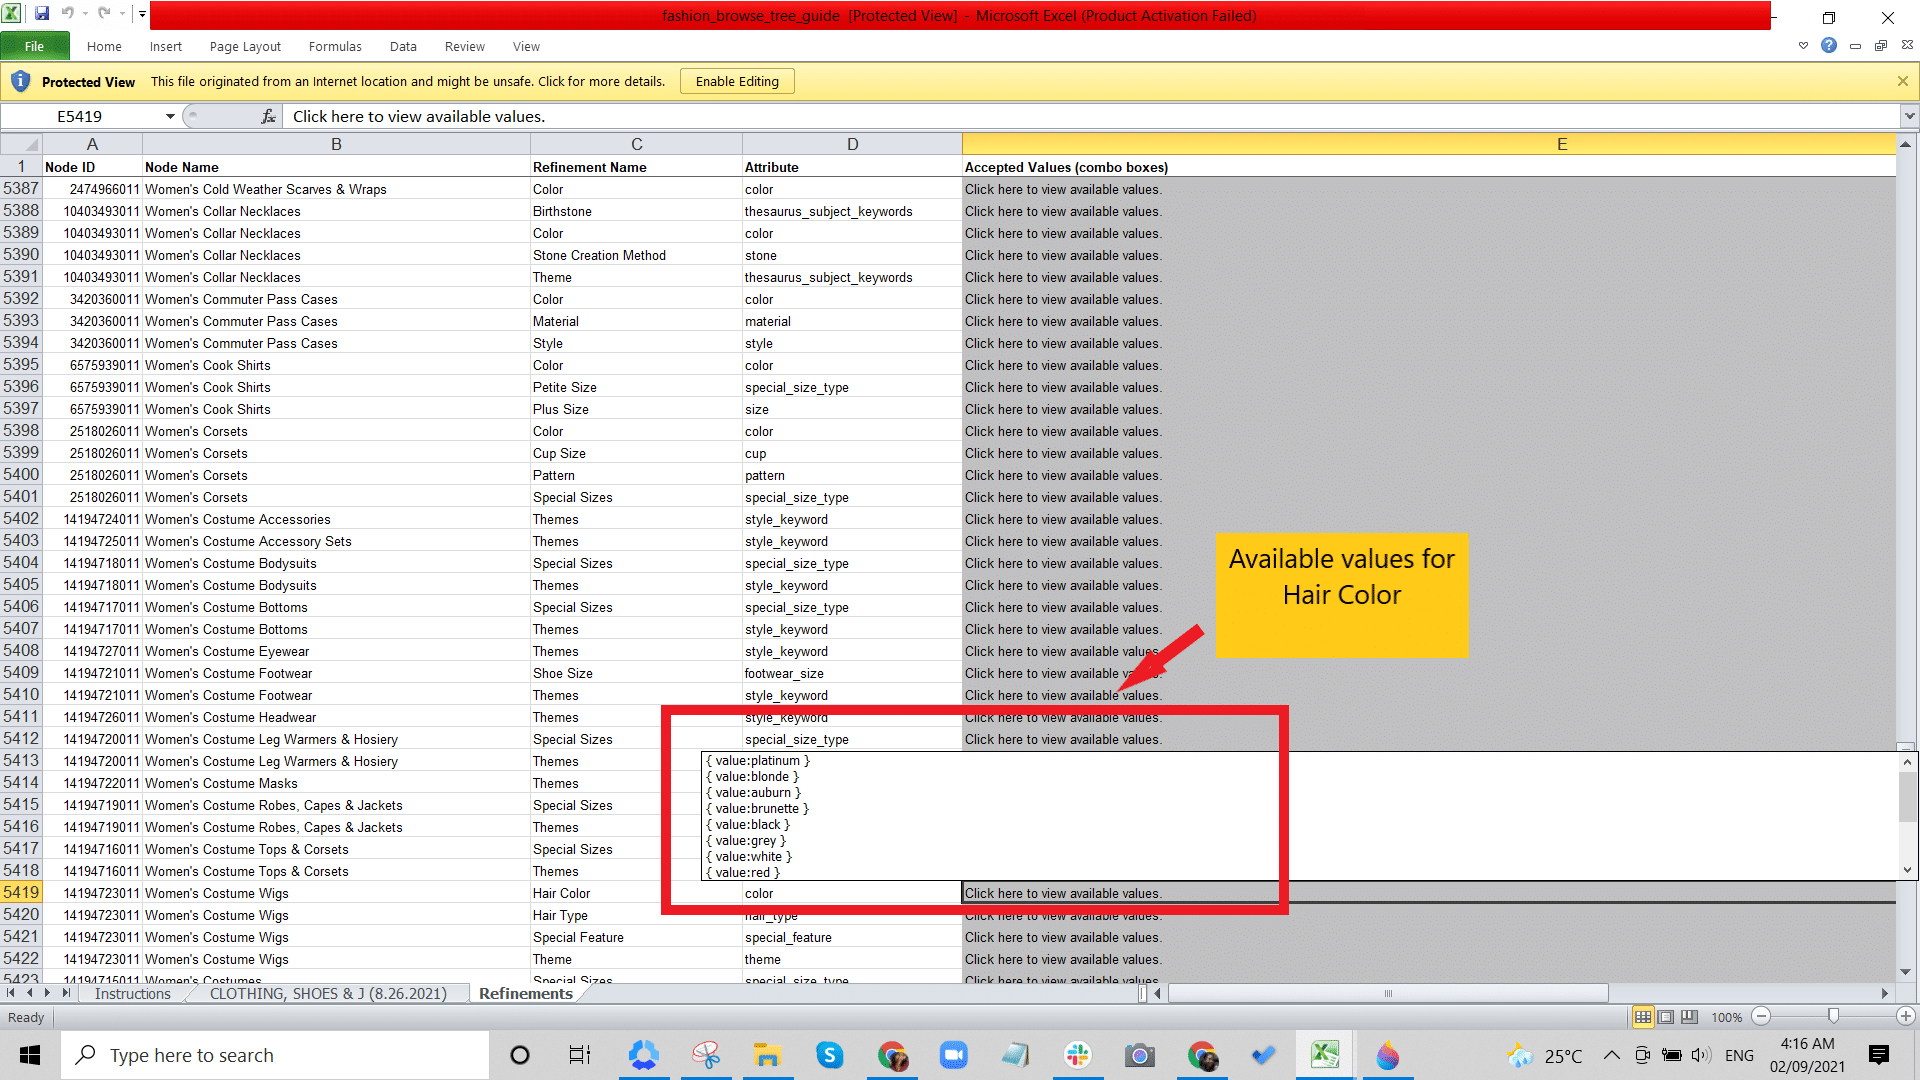
You can use the information from the BTG to fill out your flat files (if you’re using them) or edit your listing straight from Seller Central.
Wrapping Up
Amazon backend fields help Amazon’s algorithm determine who needs to see your product listing. It’s extremely important to get them right so you can attract the right traffic, i.e., those who are actually interested in what you’re offering.
What do you do to optimize your backend fields? Share it with us in the comments section below.